I'm not going to count CFM's or any flow charts or what have you. My goal for my 97 base is to simply get maybe a little over 300hp under the hood . I'll lean on three things, a latter to be bought 2.5" SS dual exhaust, one of the chips and a free-er flowing air box to let the top end smile a little more than it would other wise with the stock box. This is not my first rodeo at this sort of thing so I try to keep it as simply as possible AND as low cost as can be made and still have a quality job that will in fact work as intended to some degree. The factory box is really not bad in general design. As we all know, keeping the hotter engine bay air out of the air flow is a primary concern so I personally don't feel drilling a series of holes in the front box half ideal to that qualification. As far as air flow is concerned, I have decided to maximize the cold air flow into the stock box by entirely removing the snorkel and boring a 3.5" hole in threw the side of the box into the fender butt up tight to the silencer box, leaving that box untouched. This mod is relatively easy to get at for the entire project. The inner fender pan need not be fooled with.
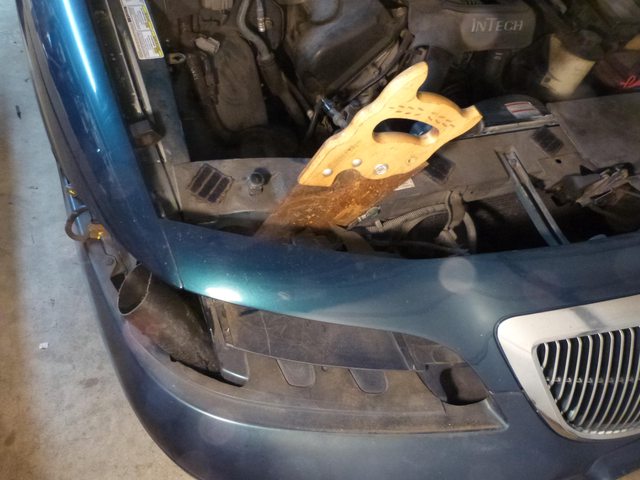
Fist take off the top core support cover panel and remove the left side head light. Then, with a carpenters cross cut saw, just saw the snorkel in 2 as pictured. The narrow tube can then be pulled out like you see in the pic.
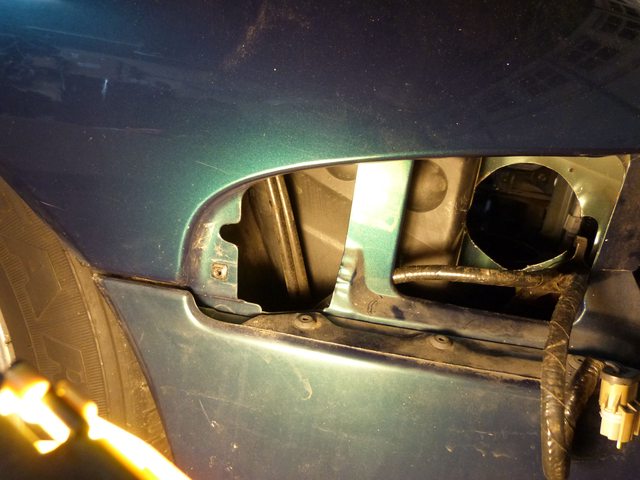
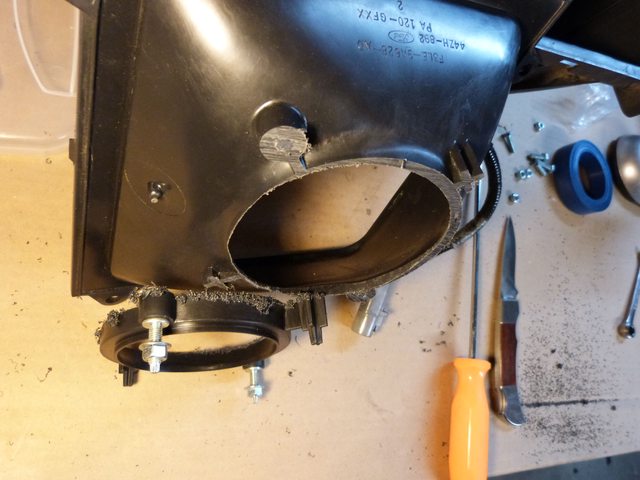
Then with a long screw driver, push in on the cut lip sticking out yet and collapse the tube that is still in the elbow and pull it out threw the elbow. All together, this is like 10 minutes from the start to now and you have a 3.25" opening at the mouth of the elbow rather than the 2&5/16ths ID opening at the mouth of the snorkel.

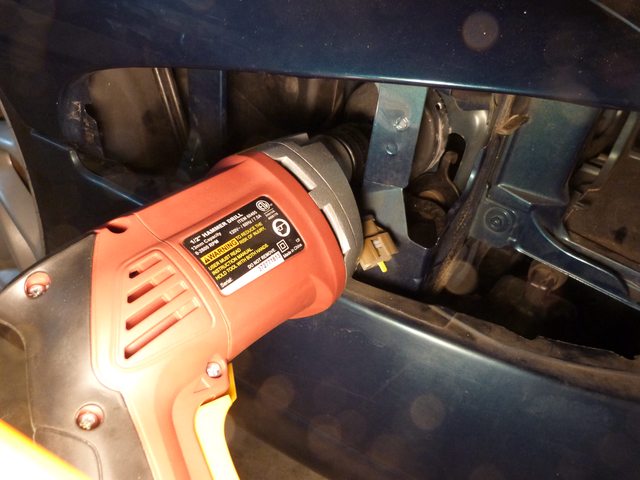
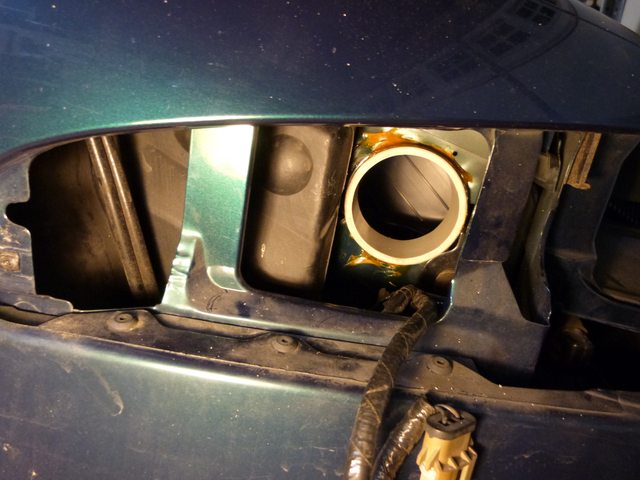
The next step will require a bi metal hole saw to cut a 3.5" hole in the fender wall. I bought a Lenox hole saw at Lowes for like 16 bucks and if you don't have the arbor, that's another 20 bucks. The hole saw will blow threw the steel fender in like 5 seconds flat. Just make sure of your positioning to get the centering drill hole placed in the right spot. As seen in the pic, that sweet spot is exactly between the silencer box and the heavy steel screw bracket to the right. You want the bell of the saw to touch the plastic box to the left and just miss the steel screw bracket to the right. With the air box in place on the other side, You only want the centering drill to bore the box. Take the box out to hole saw the side of it since you will need to angle your saw some what and that can only be done with the box out.
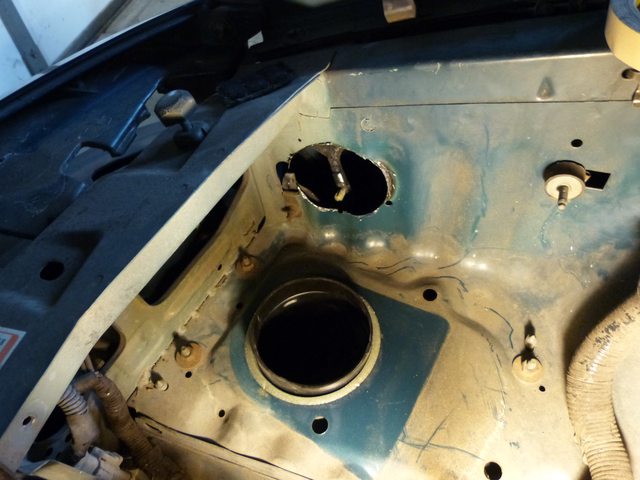
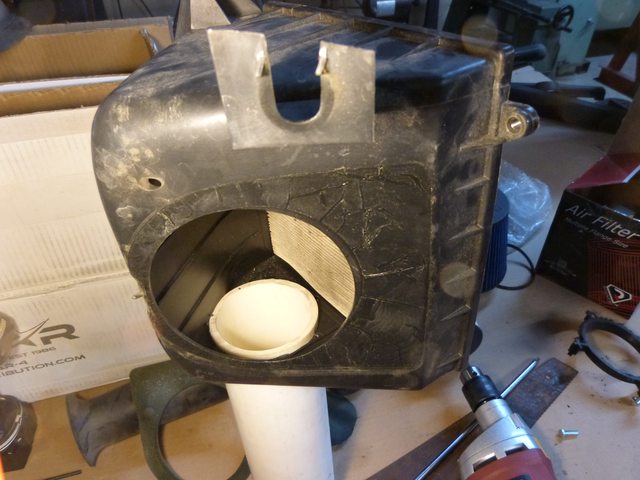
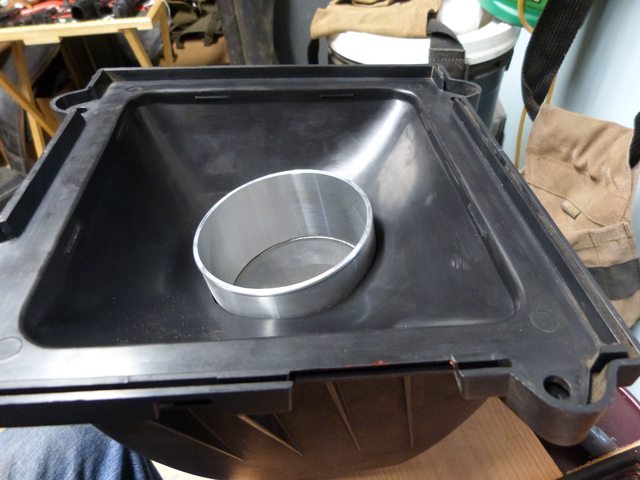
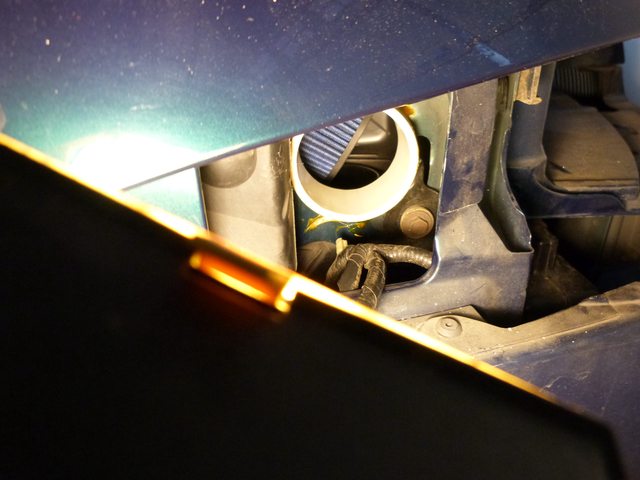
Next you need to get a short piece of 3.5" sch. 40 PVC pipe. As you can see, the pipe is very close to the box wall on the left. You need to angle the bell saw so you end up with the hole exactly like you see it. Note the OEM filter is not hindered at all with the pipe in place. The PVC pipe is glued only in the fender . The pipe mouth in the box is cut a little on an angle to match the box side wall. You want the PVC to be just slightly protruding into the box when its bolted in place. This way, you can still get the box out of the car if in need be. The pipe makes for a nice snug fit in to the box wall. no sealer needed.

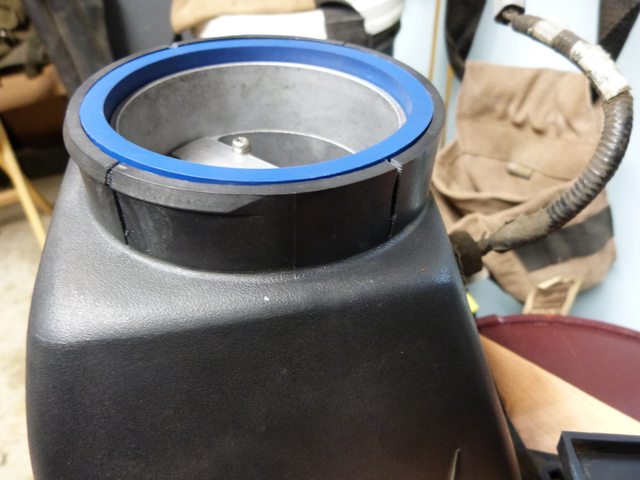
Now that the box has extremely little restriction from a 3.25" hole and 3" side hole, its time to move on to the cone air filter its self. I chose this particular filter because it has a dual filter cone, has a 4" ID mouth and has a 4" adapter spacer grommet that is crucial to the mod. BLUE 63-102mm Inlet Universal Adjustable Performance Cold Air Intake Cone Filter | eBay The pic shows the blue grommet on but it needs to be turned around to be a snug fit in the air box mouth.

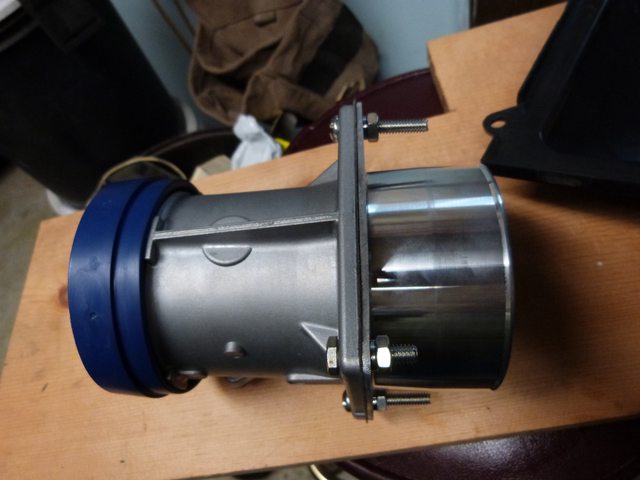
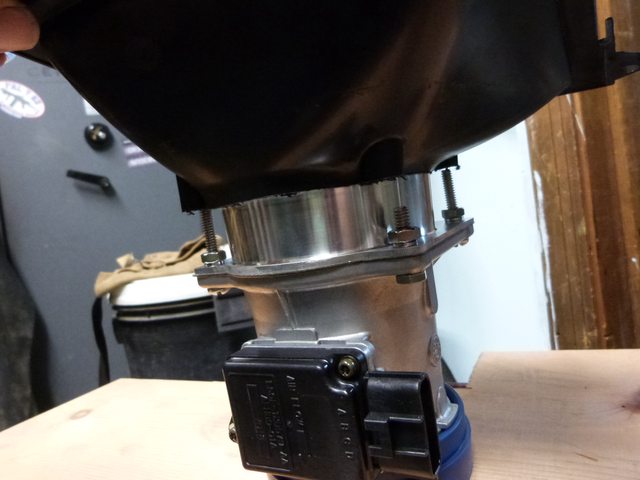
The next thing I bought to make this jell, is a Spectre #8146 4" MAF adapter . The stock MAF actually finishes in a 4" ID so this is a smooth transition to a 4" MAF in take extension to 4" cone filter mouth. The 2 long mounting screws I used as pictured, insure the air dish will keep the MAF from ever sliding forward out of its grommeted joint in the air tube.
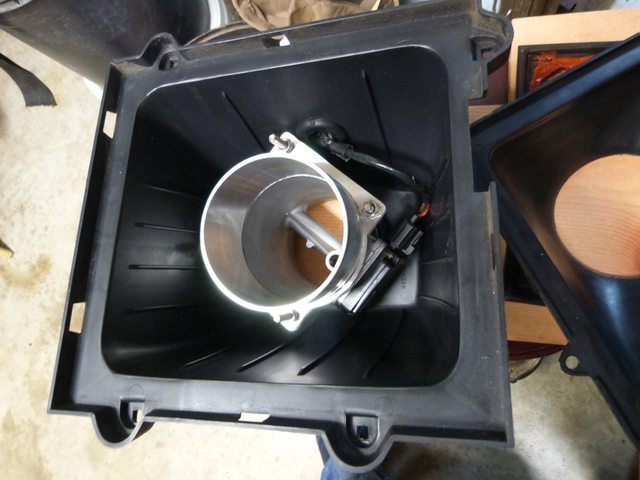
The air box mouth needs to have 4 hack saw cuts made as pictured so the manifold tube will clamp tightly on to the blue MAF grommet. These cuts will get filled with gasket maker before the manifold tub is tightened down on it.
Once you get to see how the MAF is now being positioned, The intake air dish will need to be hack sawed ( I use a band saw) as pictured. Then its a case of file the raw hole out to where it slips over the MAF adapter snugly AND snaps back into the box as it originally did.
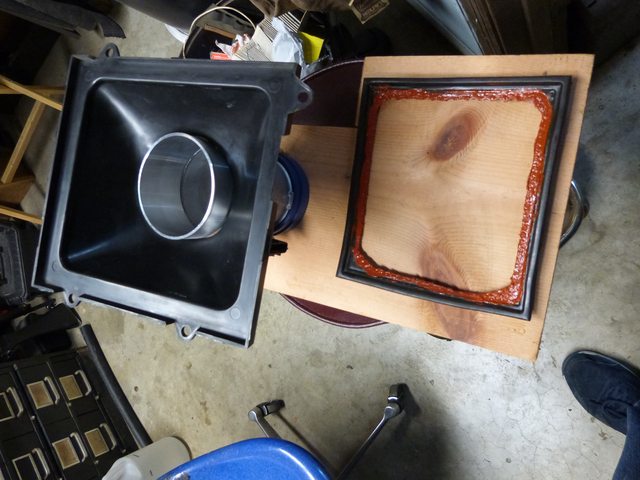
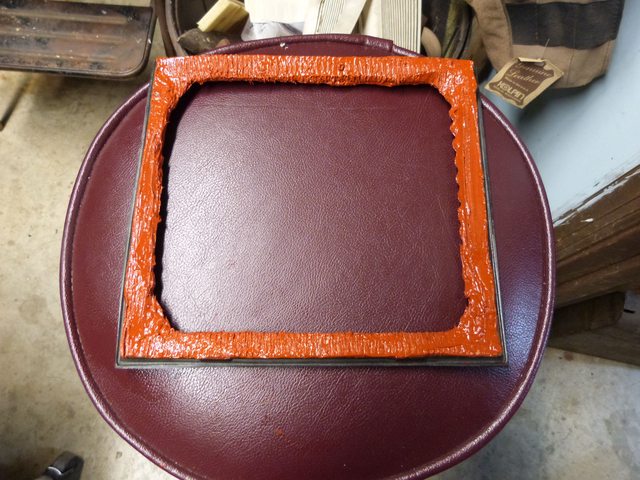
I want a factory seal on the box so I hollowed out my OEM filter with a air cut off wheel but left enough wire mesh to give the rubber gasket some firmness of shape.
A coating in gasket maker to seal the paper...
Now the cone goes on pretty good and it can still be tightened on with a screw driver and 1/4" drive with a universal knuckle.

All in place and ready for the tube to be complete.
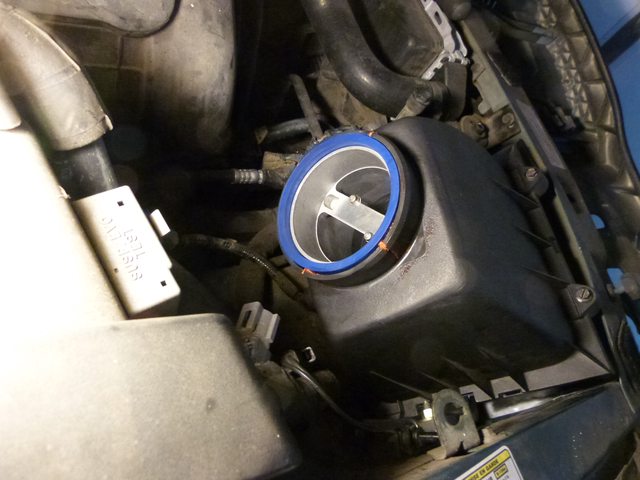
With every thing buttoned down, the cone does touch the top of the base box but not in any way hindering a good box seal with the hollow OEM filter gasket in place. You can see the cone is positioned exceptionally well to the 2 inlet holes. And if you happen to run on dirt roads , I would suggest swapping out the cone for an OEM with far better filtering capabilities. I hope this is a convenient CAI that fills a need. It was a fun project!
Fist take off the top core support cover panel and remove the left side head light. Then, with a carpenters cross cut saw, just saw the snorkel in 2 as pictured. The narrow tube can then be pulled out like you see in the pic.
Then with a long screw driver, push in on the cut lip sticking out yet and collapse the tube that is still in the elbow and pull it out threw the elbow. All together, this is like 10 minutes from the start to now and you have a 3.25" opening at the mouth of the elbow rather than the 2&5/16ths ID opening at the mouth of the snorkel.
The next step will require a bi metal hole saw to cut a 3.5" hole in the fender wall. I bought a Lenox hole saw at Lowes for like 16 bucks and if you don't have the arbor, that's another 20 bucks. The hole saw will blow threw the steel fender in like 5 seconds flat. Just make sure of your positioning to get the centering drill hole placed in the right spot. As seen in the pic, that sweet spot is exactly between the silencer box and the heavy steel screw bracket to the right. You want the bell of the saw to touch the plastic box to the left and just miss the steel screw bracket to the right. With the air box in place on the other side, You only want the centering drill to bore the box. Take the box out to hole saw the side of it since you will need to angle your saw some what and that can only be done with the box out.
Next you need to get a short piece of 3.5" sch. 40 PVC pipe. As you can see, the pipe is very close to the box wall on the left. You need to angle the bell saw so you end up with the hole exactly like you see it. Note the OEM filter is not hindered at all with the pipe in place. The PVC pipe is glued only in the fender . The pipe mouth in the box is cut a little on an angle to match the box side wall. You want the PVC to be just slightly protruding into the box when its bolted in place. This way, you can still get the box out of the car if in need be. The pipe makes for a nice snug fit in to the box wall. no sealer needed.
Now that the box has extremely little restriction from a 3.25" hole and 3" side hole, its time to move on to the cone air filter its self. I chose this particular filter because it has a dual filter cone, has a 4" ID mouth and has a 4" adapter spacer grommet that is crucial to the mod. BLUE 63-102mm Inlet Universal Adjustable Performance Cold Air Intake Cone Filter | eBay The pic shows the blue grommet on but it needs to be turned around to be a snug fit in the air box mouth.
The next thing I bought to make this jell, is a Spectre #8146 4" MAF adapter . The stock MAF actually finishes in a 4" ID so this is a smooth transition to a 4" MAF in take extension to 4" cone filter mouth. The 2 long mounting screws I used as pictured, insure the air dish will keep the MAF from ever sliding forward out of its grommeted joint in the air tube.
The air box mouth needs to have 4 hack saw cuts made as pictured so the manifold tube will clamp tightly on to the blue MAF grommet. These cuts will get filled with gasket maker before the manifold tub is tightened down on it.
Once you get to see how the MAF is now being positioned, The intake air dish will need to be hack sawed ( I use a band saw) as pictured. Then its a case of file the raw hole out to where it slips over the MAF adapter snugly AND snaps back into the box as it originally did.
I want a factory seal on the box so I hollowed out my OEM filter with a air cut off wheel but left enough wire mesh to give the rubber gasket some firmness of shape.
A coating in gasket maker to seal the paper...
Now the cone goes on pretty good and it can still be tightened on with a screw driver and 1/4" drive with a universal knuckle.
All in place and ready for the tube to be complete.
With every thing buttoned down, the cone does touch the top of the base box but not in any way hindering a good box seal with the hollow OEM filter gasket in place. You can see the cone is positioned exceptionally well to the 2 inlet holes. And if you happen to run on dirt roads , I would suggest swapping out the cone for an OEM with far better filtering capabilities. I hope this is a convenient CAI that fills a need. It was a fun project!