Degas bottle replacement with pics

Hi All:
Replaced my degas (second time since Ive owned my 2002V8 lse..bought her new) bottle a couple months ago. All was well. The upper plastic connector (tube that connects to the thermostat tower) broke a couple weeks ago. Turns out the plastic began to crumble where it connects to the upper radatior hose. Couple pieces of the plastic fell out onto the ground (under hood) when I removed the hose...but I definitely didnt see ALL of the small pieces of plastic. May have fallen on ground..or may have gone into the cooling system.

Either way..replacement went fine..bled system per procedures. no over heat at all..but now I get no heat. Just barely room temp air from any/all vents. A/C still works fine and blows cold out of all vents. But no heat.

Doesnt sound like DCCV. Is it possible something is clogged? But if something was clogged...wouldnt I get overheat due to poor or lack of coolant circulation?
Also..after driving awhile both upper and lower radiator hoses (two fattest hoses on either side of engine) get warm/hot as they should. Ditto for the smaller diameter hoses going to/from the plastic part and the cooling tower.

Suggestions?

Still sounds like t-stat to me.
 
Is this the Dorman tank? See what Joe said about the cap not sealing properly. In my experience the flow from the bleeder is more of a trickle and less of a stream.

Yea it's the Dorman deal...this is the second one so far because I (my wife) doesn't seem to understand that just buying the OEM part...however with this being said, the newest one I got seems to be holding up as far as leaks go. I haven't heard any air escaping or otherwise.
 
If the degas cap is loose, you won't get enough pressure to correctly bleed the system. Alternately, the tee in the upper radiator hose has a filter screen on the connection to the heater. It could clog.
 
If the degas cap is loose, you won't get enough pressure to correctly bleed the system. Alternately, the tee in the upper radiator hose has a filter screen on the connection to the heater. It could clog.

Degas cap is 1 year old and on snugly. Is checking/cleaning that screen as simple as removing that hose?
 
guys the only thing I want to add to this thread is that you may be able to do this degas bottle replacement without removing the strut tower/firewall brace.

The tab on the degas bottle that gets caught during extraction, that requires the removal of this brace, was cut or broken off on my old degas bottle
(lazy mechanic?) so it came out without removing this brace.

and the new dorman brand degas bottle that I purchased to replace the OEM was designed so that this tab was very flexible (yet strong) so it bent enough to slide the degas bottle in without removing the brace. was very cool

good thing too cause i tried to loosen the bolts on the brace and they didn't budge. something was going to break, and it wouldn't of been me...


hite337 nice write up and pics! thanks
 
is there anyway to do a pressure test on the bottle itself. The reason why I'm asking is because after doing the bleed properly and ensuring that all hoses and clamps are tight and not leaking, I'm still getting an over heat. Now I'm on my second Dorman bottle (lifetime warranty, just a swap) and I find it hard to believe that every single bottle has cap pressure issues and they're still able to produce such a faulty product. I want to be able to rule out the bottle without any doubt.
 
Have you replaced other plastic cooling parts? If not, you might need to start because they are letting air into the system.
 
Have you replaced other plastic cooling parts? If not, you might need to start because they are letting air into the system.

so far I've replaced the T-Stat and housing, coolant inlet tube, upper radiator hose and of course the degas bottle 2X's and I'm not seeing any coolant leaking anywhere. So it's safe to say that it's possible to have an air leak and not have any coolant come out in another place in the system that's not the bottle?
 

so is there a way to pressure test the system so that I'm not just randomly changing parts...lol like I've been doing...and be able to pinpoint the actual part that's leaking? Cause outside of what I've listed already, I don't know where else to check and I don't want to go ahead and start randomly changing parts if it's unnecessary know what I mean.
 
You need to replace the other parts. Just do it now and save yourself time and money.
 
so is there a way to pressure test the system so that I'm not just randomly changing parts...lol like I've been doing...and be able to pinpoint the actual part that's leaking? Cause outside of what I've listed already, I don't know where else to check and I don't want to go ahead and start randomly changing parts if it's unnecessary know what I mean.

Yes. The standard pressure testers replace the cap, so that won't test the pressure relief in the cap or the seal between the cap and the bottle. You could tee into one of the small hoses, like the engine air vent hose to the degas bottle. You could use an air compressor, but be very very careful not to go over 15 to 20 psi. (cap should vent around 15 psi)

Be warned that some leaks will only show up at specific temperatures. I had a T-bird radiator once that only leaked (at the side tank to cooling fins gasket) somewhere between cold and fully warmed up. I couldn't get this fixed under warranty because it would never leak when the dealer was testing it.

Look for white or orange residue anywhere on the cooling system parts. If you find any, it's leaking where you see it.
 
......Now I'm on my second Dorman bottle (lifetime warranty, just a swap) and I find it hard to believe that every single bottle has cap pressure issues and they're still able to produce such a faulty product. I want to be able to rule out the bottle without any doubt.

If all the tanks came out of the same mold the opening could be the fault. Same with the caps. I would suspect the product itself as I don't remember reading of a successful Dorman install.

But like Joe said, white residue is a dead give-away.
 
So after replacing the inlet tube and thermostat housing (both crumbling (with brown residue) on ends that connect to hoses) and thermostat..all new OEM Motorcraft parts and doing two very thorough by the book bleeds? Im still not getting heat into the cabin. My engine is now warming up quicker/like it used to prior to the upper hose coming off the old inlet tube that cracked (so Im guessing the thermostat replacement was needed) but still no cabin heat. When I removed that upper hose that t's off to the DCCV, I flushed that hose thoroughly and there didnt appear to be a clog. (poured water into one large end, covered the other large end, and water flowed freely out of the smaller opening that goes down to the DCCV inlet hose.)

Also when the car is fully warmed I confirmed both radiator hoses get hot as does the aforementioned smaller diameter hose (coming down from the "T" of the upper radiator hose that I took off/flushed) that feeds the DCCV. Unable to get my hand down to feel the other small hoses on the DCCV.

AC blows cold out of all vents driver and passenger side but no matter what setting, I can no longer get heat from any vent into the cabin.

Is this symptomatic of a failed DCCV? (It's original..as was the failed plastic parts...2002 LSEV8 that I've owned since new December 2002...158k miles currently)
 
I should have searched better...let me run these checks as posted by JOEGR in another thread:

1242 is for the air inlet door. If it's a stored code, then it's probably not really a problem. When you press the fresh air/recycle button does the airflow change? If so, then the air inlet door is working. In any event, it's not related to the no heat issue.

No heat at idle could be a failed aux pump.
No heat at anytime could be -
1. Air in the cooling system. On gen I that is usually due to a cracked degas tank. (They crack just as much on gen II, but gen II has other parts that crack a lot too.)
2. The filter screen in the upper radiator hose where it tees off to the DCCV is clogged.
3. The DCCV is clogged or stuck closed.
4. The cold-air bypass door is stuck at the bypass position (you should have gotten a fault code for this).


Warm the engine up and turn the climate control to 90. Wait a minute and then check the three heater hoses near the firewall. If they are really hot, then it might be the bypass door. If they are cool or barely warm, then it's 1, 2, or 3 above.
 
Ok..so on my Gen I I was unable to get the climate control into code mode via the step by step process on this site. (which says it's for the Gen II but "should" work on the Gen I)

Can someone assist by posting how to check codes in a Gen I?

also..I noticed that my thermostat housing cap kept getting damp with coolant in the recess where the allen wrench goes to loosen it. Figured must have been a hairline crack somewhere just like the orginal had at 80k or so when i replaced it. (now at 158k). So i picked a a new one from the dealer and replaced, then did a complete rebleed.

No dice..still have no heat in the car and none of the 3 hoses on the firewall are hot to the touch after the car is fully warm/temp set to 90.

Im thinking the DCCV is stuck. If I unplug the DCCV does that "unstick" it and set it to a default all heat mode? Also, anyone know the exact fuse I need to check for the DCCV?

Thanks again.
 
was able to get the Gen I instructions (auto plus floor then hit off within 2 seconds) but no stored codes.
 
REsolved.

Took it to a local independent shop who didnt want to just put in the new DCCV I purchased. They wanted to diagnose on their own. Called me 2 hours later and said hose going INTO the Aux Coolant Flow Pump was hot but the hose leaving that pump was cold. THey then hooked up that pump directly to 12v and..nothing. (keep in mind my symptoms were zero heat in the cabin at ALL..not at idle/not at highway speeds).

I gave approval to replace that pump but to still replace my original 10year old 160k DCCV (even though they said preliminary tests didnt necessarily show anything wrong with the DCCV, although they would not be able to know for sure until they replaced just the aux pump..then retested) with the new one I had already purchased. They replaced both items and now all is perfectly fine.

DCCV was about $185 and Aux Pump was about $175 or so. Forget the labor charge but I recall it being about 3 hours. They also had to remove the AC drier to get to the pump/dccv. I told them that actually they dont, but I also tempered it with "Im not going to TELL you how to perform your repairs".

Bottom line: problem fixed, my 2002 LSE with 160k is now running flawlessly again. (for now)
 
Alright, so far this is working out nicely, thank you Hite for the detailed write-up.
rather simple though ... anyhow, Hockey game is on, got all long weekend to worry about the rest of the cooling system.

+1
 
Thanks for bumping this thread. Summer's around the corner and a lot of us newer folks may end up needing these instructions. 'preciate it.
 
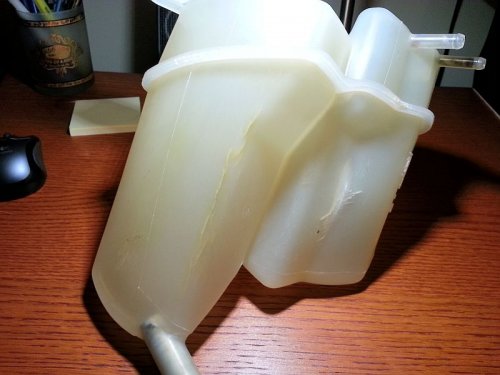
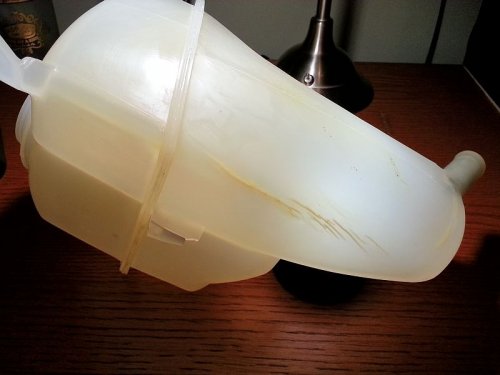
Damn Degas ...

This thing had more holes in it then a block of Swiss cheese!

degas1.jpg
degas2.jpg

The wife, she's such a sweetheart, "can't you just glue it?"

~ No, honey, that's only your car that gets the glue and duct tape!

degas1.jpg


degas2.jpg
 
Damn Degas ...

This thing had more holes in it then a block of Swiss cheese!

View attachment 828455234
View attachment 828455235

The wife, she's such a sweetheart, "can't you just glue it?"

~ No, honey, that's only your car that gets the glue and duct tape!

Lol, sounds like something my ex wife would have said.

Mine cracked in the same exact spot :-/ Just pulled mine today, getting money raised up by selling useless (to me) junk.
 

Members online

No members online now.
Back
Top