THX navigation to aftermarket

joegr

Dedicated LVC Member
Joined
Dec 10, 2005
Messages
21,559
Reaction score
2,360
Location
Gulfport
I've been having some problems with the tuner in my THX nav headunit. After being unable to repair it, I decided to go after market (JVC KW-NT700).
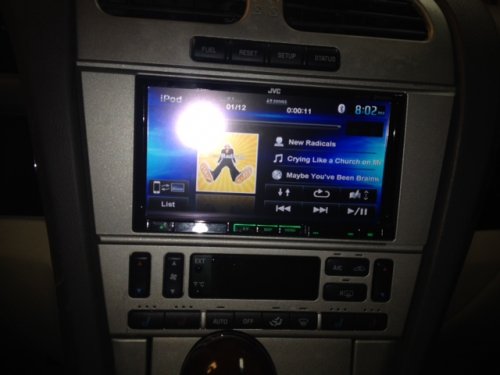
photo 1.JPG

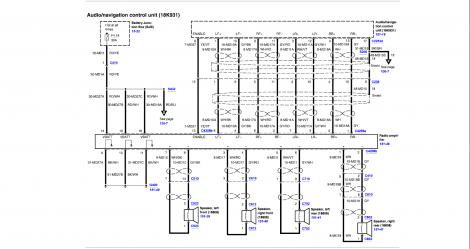
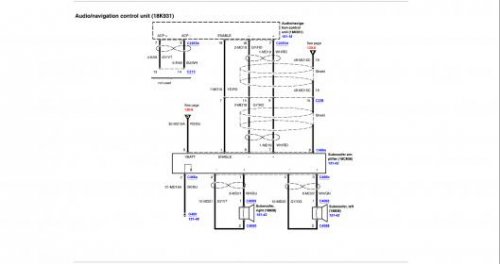
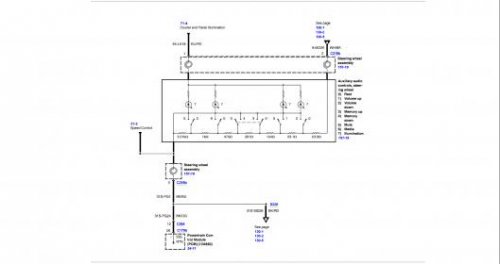
Fortunately, I was able to retain the factory amps and speakers. I used the following diagrams to figure it out.
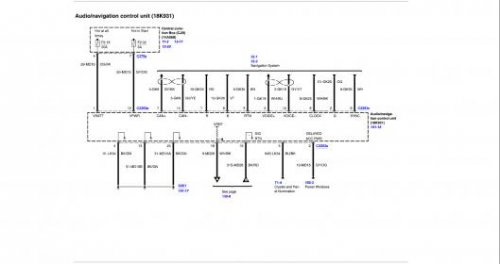
nav1.jpgnav2.jpgnav3.jpgnav4.jpg

Unfortunately, there are no wiring harness adapter kits out there for this. I cut the factory headunit connectors and spliced and solder to the JVC's harness.
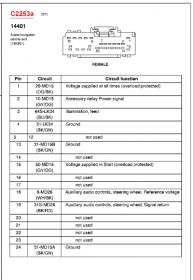
nav_head_power_con.jpg
This is the "main" connector to the THX nav. You can get a mating connector to this from some adapter kits, but there are only six wires to connect here. Since I could get mates for the other two connectors, I just cut this one off too. Here you get the power connection, the switched connection (in this case, it is the RAP, retained accessory power), the ground, the dash light dimmer feed, and the two wires for the steering wheel controls.
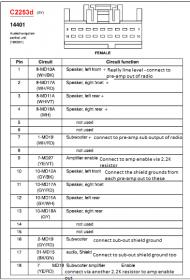
nav_head_audio_con.jpg
This 18 pin connector is the audio from the THX nav. Even though the pinout says "speaker" these are actually line level inputs. They are differential inputs, but just like the sub input, they work just fine in single ended mode. I connected each of the two amplifier enables to the JVC's amplifier enable output, with a 2.2 K ohm resistor in series with each. No pops.

Now, we move back to the trunk for a moment. This is the connector to the DVD nav computer in the trunk. Note that it is all the same type connector as the "main" connector to the radios. Here, I did use a mating connector from a harness adapter kit I happened to have.
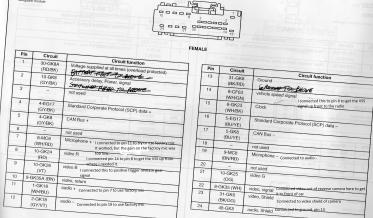
nav_dvd_con.jpg
The first thing I did was to connect the two microphone lines to the "audio" lines. This way I was able to get the connections for the microphone in the factory mirror up to the JVC unit (via the re-used "audio" lines). While this did work, unfortunately the factory mic was too quiet and I could hardly be heard using it. I had to switch to the mic included with the JVC. I mounted it on the mirror.
Next, I connected the VSS signal (pin 14) to pin 8, because the "Video Red" signal runs all the way back up front to where the JVC is.
I also connected a reverse gear signal and the video from a reverse camera as indicated. Again, this is all just to get those signals up front. You can run new wiring from the trunk to the front instead if you want, but this saved all that work for me.

Now back to the front again. This is the video connector to the THX nav.
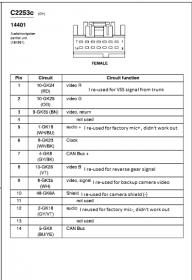
nav_head_video_con.jpg
This connector had all the video and control signals between the THX nav headunit and the THX nav DVD/computer unit. Since most of these were only connected between the two units and most of the wires are shielded, I used this wiring to get the rest of the signals needed to the JVC.

Oddly, the JVC only accepted a positive trigger reverse gear signal. I could have tapped this signal at the REM where it sends a positive trigger to the auto-dim mirror, but I didn't. I added a small relay to turn power to the camera on only when in reverse (because the camera got kind of warm if left on all the time). I just pulled the positive trigger signal from this relay, since it was there.


I haven't played with it too much, but so far I like it. It sounds really good to me, and it has many settings for sound, including a lot of DSP stuff.

photo 1.JPG


nav1.jpg


nav2.jpg


nav3.jpg


nav4.jpg


nav_head_power_con.jpg


nav_head_audio_con.jpg


nav_dvd_con.jpg


nav_head_video_con.jpg
 
I love the reusing of the OEM wires.

that is about as complete as it gets.

well done indeed.
 
One day, when my THX craps out, I will do the same. That unit looks nice. Looks like some good deals can be had as this is a discontinued unit? Joe, is it possible to attach or link larger sized diagrams? I cannot read these as posted. The only other similiar install (using factory speakers/amp) was Andrizzle's write up. This is good info to have. Can a custom harness be created or is cutting and soldering factory harnesses to radio wires the only way to go?
 
One day, when my THX craps out, I will do the same. That unit looks nice. Looks like some good deals can be had as this is a discontinued unit? Joe, is it possible to attach or link larger sized diagrams? I cannot read these as posted. The only other similiar install (using factory speakers/amp) was Andrizzle's write up. This is good info to have. Can a custom harness be created or is cutting and soldering factory harnesses to radio wires the only way to go?

Yes, it is a 2012 unit, so $600ish instead of $900ish for the current model.
I attached full size (well, big enough to read) images and I guess the site down sized them. Anyone who wants the files, just PM me your e-mail address.
The problem with a custom harness is getting the mating connectors for the audio connector and the video connector (though you could skip that one and run your own wires). I was tempted to remove the connector from the factory THX nav headunit, but I didn't. I think that I will see if I can sell the unit for parts. The screen is still perfectly good, as is the CD changer.
 
Good information.

Glad I didn't have to mess with using the factory amps, but this write up paves the road for that.


I wonder if these modern headunits actually produce more RMS wattage to the speakers than the THX amp could. I couldn't find any specs on the RMS from the THX system amplifier.
 
...The only other similiar install (using factory speakers/amp) was Andrizzle's write up. ...

I didn't think that he used the factory amps.

...Glad I didn't have to mess with using the factory amps, but this write up paves the road for that...

Guess he didn't.


...I wonder if these modern headunits actually produce more RMS wattage to the speakers than the THX amp could. I couldn't find any specs on the RMS from the THX system amplifier.

I have seen the power figure for the factory THX amp, but I don't recall it off hand. I suspect that in this case, the factory amp has more power. Just look at the size of the amp and the heatsink finds on it.
This JVC has a setup option to turn off its internal amps. I feel like that should at least make it run cooler.

Edit: I think that the THX factory amps are 50 Watts RMS x 4 (each door) and 32 Watts RMS x 2 for the subs.
The specs for the JVC are 20 Watts RMS x 4, and no amp for the subs.
 
Bookmarked!!! nice work joe
 
I have no doubt that the THX system is more powerful than the amps in any headunit. there is a huge difference between a 20w (RMS per ch) headunits amp and a 20w (same) stand alone component amp.
 
This JVC has a setup option to turn off its internal amps. I feel like that should at least make it run cooler.

it surely will, I would say most of an aftermarkets heat (and power consumption) are due to the internal amp, I would figure that a nav radio would use a little more power outside of the amp because of all the computer/processor stuff needed for the nav.

any time i install a headunit into a car that does have factory amps, i always shut off the radios internal amp if possible, basic decks barley get warm to the touch!
 
Joe, are you happy with the navigation and sound of the JVC unit? I'm close to buying the KW-NT510HDT. Of course, the Amazon counter is down to 2 available, was 6 before. By the time I get my tax return, hope there are still some for sale. Crutchfield is really dicey on JVC head units right now. Inventory is constantly changing and usually shrinking.

I had been thinking about getting the steering wheel adapter, replacing/upgrading door speakers and subs, adding an amp, but the cost really goes up. Right now, I'm thinking just the headunit and a backup camera and that's all for right now. I have a super loud, top of the line stereo in my truck if I need that. I think in the car, at least for now, I can live with less volume and save my ears some damage.

I'm wondering if you added an amp and upgraded your speakers or kept stock and if you're happy with the decision either way. Thx!
Oh and did you rig it to bypass the safety mechanism that keeps all the cool stuff from working when you are moving?
 
It's all stock except for the head-unit.
I am very happy with the sound and with the navigation. The navigation uses the speed sensor and gyroscopes just like the factory unit, so it even works in tunnels.
I did the parking brake "bypass" (grounded the parking brake sense lead). The only reason I did this is that on the gen II there is no parking brake signal available. I have thought about making a little microcontroller circuit to read the VSS and assert the brake signal when the car is not moving. I'll never watch a movie in the car (moving or not), and I'm not good enough to be able to enter addresses while moving.
 
Joegr,

I'm about to install the kw-nt500 in my wife's car. I have a couple of questions. First, can you send me the diagrams? Second. did you have to buy an after market mounting kit, or did the metal frame that came with the unit work well enough? Did you use the RCA pre-amp outs on the JVC to send the signal to the line inputs? If so, did you just cut some RCA cables to solder to the existing amp inputs? And what was the purpose of the 2.2.K Ohm resistor?


Thanks, and nice work.

Tony
 
FYI. I found this harness for those of you not looking to hack the wiring in the car. It's designed for a bluetooth add on module, but it should allow for a plug and play stereo install:
Ford Harness

As I added bluetooth a few years ago, I might actually have this in my car already (I don't remember if it's the full harness). Fingers crossed, I'll find it there when I check later this evening.

Tony
 
1. PM me your e-mail address.
2. I bought the LS dash kit and used it, but I also retained the metal brackets already in the car. (The screws were long enough to go through the plastic bracket and the metal bracket.) I didn't like that the plastic brackets didn't attach as a single piece to both the top and bottom mounting bolts. I did not use the DIN sleeve that came with the JVC.
3. Yes.
4. Yes, I did.
5. The factory amps expect a turn-on control signal voltage of about 7 volts, but the aftermarket units put out about 12 volts. The resistor limits the current going to the turn-on inputs and so reduces the voltage. Without the resistor, you will probably get a "thump" sound when turning the radio on and off.
 
FYI. I found this harness for those of you not looking to hack the wiring in the car. It's designed for a bluetooth add on module, but it should allow for a plug and play stereo install:
Ford Harness

As I added bluetooth a few years ago, I might actually have this in my car already (I don't remember if it's the full harness). Fingers crossed, I'll find it there when I check later this evening.

Tony

There are lower cost harnesses available to do that. The problem is that those and the one you linked only work for the non-THX nav LS. If you have factory THX nav, which is what this thread is about, then none of those will work for you because most of the connectors and connections are different. If you don't have THX nav, then the diagrams you asked for will not do you any good, because your car will be wired very differently.
 
There are lower cost harnesses available to do that. The problem is that those and the one you linked only work for the non-THX nav LS. If you have factory THX nav, which is what this thread is about, then none of those will work for you because most of the connectors and connections are different. If you don't have THX nav, then the diagrams you asked for will not do you any good, because your car will be wired very differently.

I do have the THX/Nav/Factory Amp system. So, if you can, please send me the diagrams.

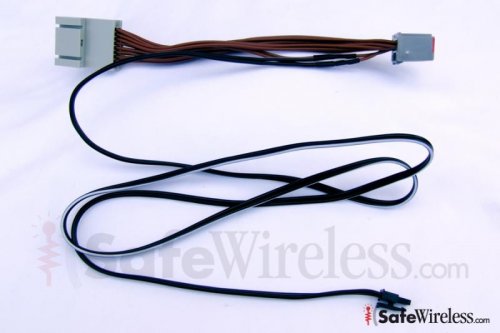
Also, according to the site, this harness is for the NAV/AMP systems:

FCSS-2P
This Bluetooth harness adapter, FCSS-2P is designed for Ford amplified, NAV, or mute on the radio vehicles using the Parrot CK3000 and CK3100 car kits.

And, if you look at the images, the 4th image appears to be the 18 pin connector that is so hard to find.
FCSS-2_04-01.jpg

Of course it could also be a 16 pin connector. I just can't tell. Let me know if I'm out of my mind.


Tony

FCSS-2_04-01.jpg
 
I do have the THX/Nav/Factory Amp system. So, if you can, please send me the diagrams.

Also, according to the site, this harness is for the NAV/AMP systems:

FCSS-2P
This Bluetooth harness adapter, FCSS-2P is designed for Ford amplified, NAV, or mute on the radio vehicles using the Parrot CK3000 and CK3100 car kits.

And, if you look at the images, the 4th image appears to be the 18 pin connector that is so hard to find.
View attachment 828464864

Of course it could also be a 16 pin connector. I just can't tell. Let me know if I'm out of my mind.


Tony

I guess it is possible, but unlikely. There is no need to make any connection to the 18 pin connector that has all the audio outs on it. There is another connector that is for the phone input and the sat radio receiver and such. (I didn't mention it above since there is no need for it with the conversion.) I suspect that this is the one shown. I actually had a parrot bluetooth connected to my THX nav using Ford's Mobile-ease harness adapter. It didn't have any connection to the audio out connector. I'll send the diagrams/pin-outs tonight.
 
That camera looks pretty cool! And way cheaper than what I was looking at:
http://www.crutchfield.com/p_074RVC115T/Accele-RVC1150T.html#category-info-tab

I'm thinking a great mounting spot would be the wide, flat area above the license plate, perpendicular to the plate area. Is that where you put yours?

Same on the steering control module, cheaper than what I was seeing on Crutchfield and I hadn't looked on Amazon yet. That makes it affordable enough to get that installed as well.

I can't really tell what color my dash is. It's a light color, nondescript though. Could be light tan, could be gold, could be silver, hard to say. Use the Silver mounting plate? Would a Best Buy installer just cut out the existing plate himself and not need that? I'm going to review it all with him before I hand all this stuff off to be done.
 
2. I bought the LS dash kit and used it, but I also retained the metal brackets already in the car. (The screws were long enough to go through the plastic bracket and the metal bracket.) I didn't like that the plastic brackets didn't attach as a single piece to both the top and bottom mounting bolts.


I also needed to re-use the factory steel brackets. there is not much extra room behind the radio. with all the extra wiring I have back there, even with the best tucking I could manage, there was too much flex and the center bulged out and made the split between the dash kit and the climate controls really stick out.
 
I can't really tell what color my dash is. It's a light color, nondescript though. Could be light tan, could be gold, could be silver, hard to say. Use the Silver mounting plate?

00-02 LSs have a black dash, 03-06 LSs have a silver dash.

unless somebody has sprayed your dash different, yes, use the silver dash kit

Would a Best Buy installer just cut out the existing plate himself and not need that? I'm going to review it all with him before I hand all this stuff off to be done.
a Best Buy installer will have to order the dash kit, they are not going to cut up the OEM radio.
 
That camera looks pretty cool! And way cheaper than what I was looking at:
http://www.crutchfield.com/p_074RVC115T/Accele-RVC1150T.html#category-info-tab

I'm thinking a great mounting spot would be the wide, flat area above the license plate, perpendicular to the plate area. Is that where you put yours?

Same on the steering control module, cheaper than what I was seeing on Crutchfield and I hadn't looked on Amazon yet. That makes it affordable enough to get that installed as well.

I can't really tell what color my dash is. It's a light color, nondescript though. Could be light tan, could be gold, could be silver, hard to say. Use the Silver mounting plate? Would a Best Buy installer just cut out the existing plate himself and not need that? I'm going to review it all with him before I hand all this stuff off to be done.

Yes, that's where I put the camera. I painted the camera black. I wanted one that you wouldn't see unless you were looking for it. I took the license surround out to mount it. It's easy to remove. I'll post a picture when I get a chance to take one in the day light.

There are only two colors for the center dash trim. Black for the gen I, and silver for the gen II. No other colors were ever used on the LS for those parts.
 

Members online

No members online now.
Back
Top