ACCEL Ignition COP install

most people were just not comfortable with the extra force being applied to the coils connector...

Looks like the connector for the #1 coil is taking the brunt of it. Wonder if that area could be modified (dremel?) on the cover or otherwise so it rests easier...
 
Yup. I followed the instructions I found here on switching the wires in the socket. The pictures helped a lot! I didn't break any of the red locks thanks to the pictures provided. When I pressed the cover on, I didn't feel anything bottom out. My original intention was to just put the cover over the coils and screw the bolts in just enough to hold the cover in place. This would have left a 1/4" gap all around. I could still do that. All I would have to do is unscrew the bolts about 5 threads. The bolts are long enough.
 
I could still do that. All I would have to do is unscrew the bolts about 5 threads. The bolts are long enough.

I definitely would drive around with loose bolts in such a vibration rich environment as the motor of a car.

I would expect them to fall out very soon.
 
I went with Motorcraft Coils for my LS because The Accels i used in The 5.4 in my F150 started failing after less than a year. Even with tons of dielectric grease, and no oil leaks.

It sucks that we cant get one name brand option to replace the only real option of motorcraft ones.
They complain about a run of 200 mimimum, yet from my time here on these forums, if accel made an LS set at the same price point as the Mustang ones we would be in the run of thousands of cops by now, haha. LS owners would flock to them, I think.
 
Not the best choice.

Yeah, more is less right.
Since these are exposed to the elements on the F150 i used dabs to help seal moisture out of sliding down the boots and into the business area of the coil, Maybe 1/100 of the tube was used past a dab to seal the plug. Its not like the coils are oozing grease lol.
 
Recently installed these on my '06, hoping to fix a slight misfire when the vehicle reached operating temperature. If you look at the rusty bolt at the top left of the picture, water seemed to be pooling there and running into the ignition coil "bay" underneath the cover. You could see the residue from the leak inside the bay. It had gotten into the 4th and 2nd plug well, oddly skipping the 3rd in between (either from boot degradation on the infiltrated wells, or from a recent replacement). They were really rusty, and the old coil boots were more orange than black.
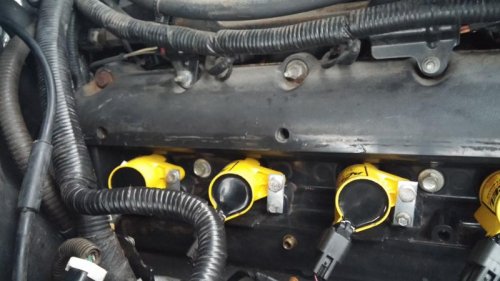
20150208_172017.jpg
I bought some stainless steel corner brackets (set of 4 for about $2.50) and just cut the corners out. Leaving me with 8 well sized COP brackets; the space you need between the two holes is about 2 cm. I used some tubing, like the kind you get for washer fluid line, under the bracket to keep tension on that 7mm bolt since there will be a gap there. Although this way is probably a little tighter, if I had to do this again I'd suggest PM'ing Hite337 for his fabricated ones.The Accel coil fittings were pretty easy to tap for a regular stainless steel screw, hand-tightened with some loctite (didn't want to use too much force there).

I really think people considering these should try and use the boots that came on the Accels, they seal the plug wells very satisfyingly. Orientation of the Accels comes into play here in order to get them to make good contact with the spark plug. You'll have to contend with the bump underneath the electrical connector (you can see it sticking out on the far right of the above picture) and the intended mounting bracket. The driver side (not pictured) coils are rotated 90 deg clockwise in order to fit in the same way, yes the connectors wont be orientated the same on both sides. It doesn't look cosmetically perfect, but hey, it gets the job done.

After mauling my first connector, I had a few ideas that may make it easier for future attempts.
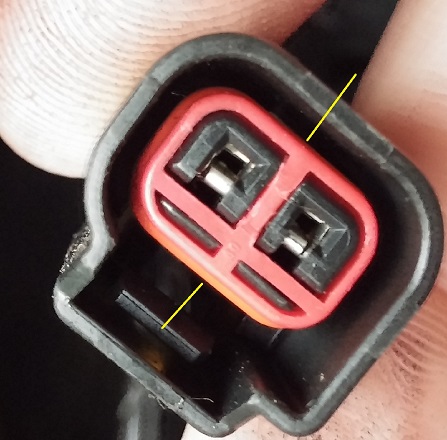
connector.jpg
1. I wouldn't suggest using anything like a regular flat screwdriver. The force it applies to the red plastic piece is just too spread out. Instead use two small instruments, like jewelers/mini flat head screwdrivers, right were the two yellow lines are. This is a bulky area of plastic that is less liable to breakage.

2. Having another set of hands is tremendously helpful.

3. Like others said it doesn't come out all the way, but enough to grab it with something. Stop your prying and use surgical style forceps if you have them, or needle nose pliers to pull it out the rest of the way.

4. To depress the detent to remove the wiring, you don't need much force just well placed or you'll break more plastic. I found it easier to push on the fat, curved section of the wiring ends to back it out of the connector with my small screwdriver, rather than pulling the wire out the back.

Its not hard to do, just take your time. I hope this helps people for future installs.


Some questions for people who have done this:

Did anyone else not have connectors "click" into the Accel COPs? I had about half of them just fit on with friction. After a drive I checked them and all but one is now properly locked on to the COP (weird, heat expansion?). I'm wondering if the little red gasket in the connector on that one is twisted or something.

I'd like to track down that water leak on the passenger side. The hood seal seems great, almost new. I'm thinking the plastic cowl that goes under the wipers and over cabin air box is suspect. It seems to be leaking right where the low point on that seal to the windshield is. Tests were inconclusive, but I couldn't really replicate hours of rainfall. Can anyone confirm this as a problem area?

connector.jpg


20150208_172017.jpg
 
I'd like to track down that water leak on the passenger side. The hood seal seems great, almost new. I'm thinking the plastic cowl that goes under the wipers and over cabin air box is suspect. It seems to be leaking right where the low point on that seal to the windshield is. Tests were inconclusive, but I couldn't really replicate hours of rainfall. Can anyone confirm this as a problem area?

Look at the seal that lives at the base of the wipers. The seal wears out and no longer seals. They are pretty cheap; like <$10 each, IIRC.....
 
Look at the seal that lives at the base of the wipers. The seal wears out and no longer seals. They are pretty cheap; like <$10 each, IIRC.....

The wiper motor bracket seals? Thanks for the tip. I guess water could be running along the cowl or along some wire looming and end up on the passenger side.
 
The wiper motor bracket seals? Thanks for the tip. I guess water could be running along the cowl or along some wire looming and end up on the passenger side.

No..... At the base of each wiper arm; on the stud.
 
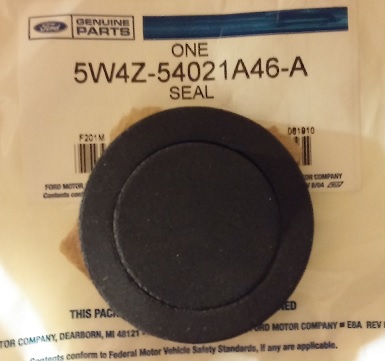
Right, parts counter knew what I was talking about. Although the official name is something like a wiper inlet seal. $4.50/ea
inletseal.jpg

It was a "warmer" day so I took the LS to a coin-op wash and tested it out. My suspicions were correct on the cowl panel grill. One of the first things I did when I bought the car was index the wipers properly, they were sitting too low. The dealer/previous owners must not have noticed and they rolled back the seal to the windshield on the passenger side a bit. Enough to get a little water through and end up right near my problem area. May be pliable with some heat application, or i'll just get a roll of foam weatherstripping.

Anyway, something people might want to look out for.

inletseal.jpg
 
I have had my Accel's for a month or so and they are doing great so far. I have tried several brackets for mounting the COP's and have finally perfected the brackets (patent pending...j/k) with some 1/2" aluminum I had left over from work. I have tried the Accel boot in several different positions to get the best fit in the plug well and had the best fit being the way they came out of the box.

View attachment 828531667

Hi Hite!

Could you share the bracket dimensions please?

Best regards!
 

Members online

No members online now.
Back
Top