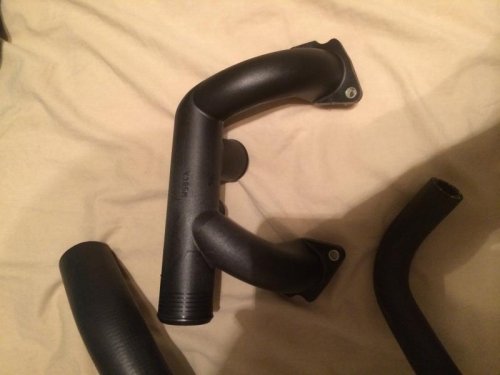
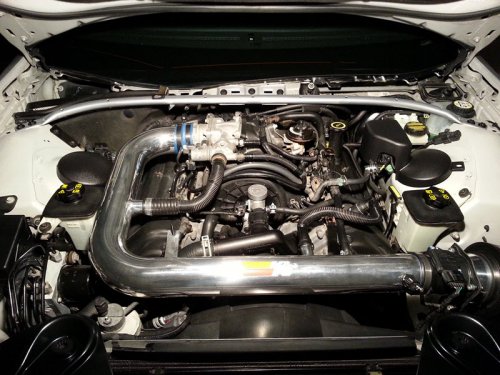
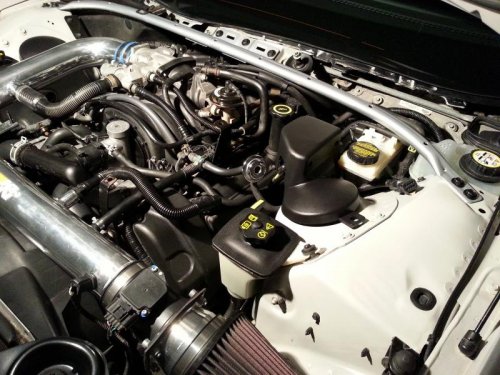
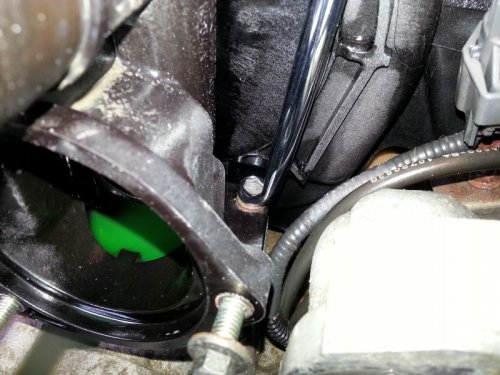
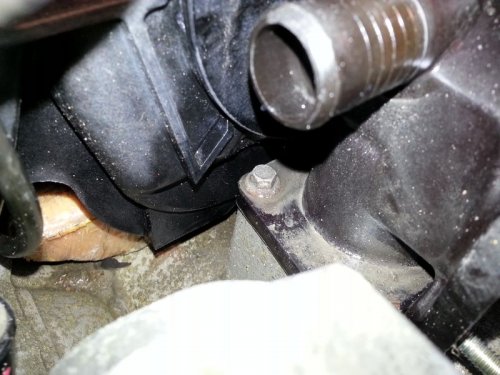
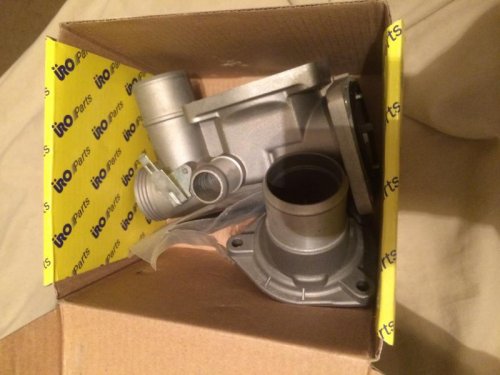
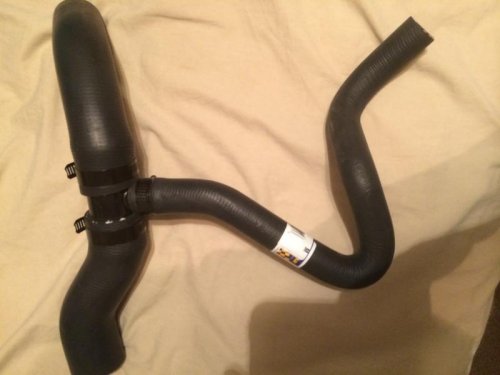
Upper radiator hose made by good year.

Blueberryyum02

Well-Known LVC Member
Joined
Sep 7, 2012
Messages
449
Reaction score
13
Location
Griffen
image.jpgimage.jpgimage.jpg

Ok I'm about to tackle this coolant tubing replacement.
I order the Goodyear upper radiator hose instead of the motorcraft. And I must say now that I have it in hand. It's looks and feels way more sturdier, then the motorcraft part,

Also if the T fails I can just change that one piece, since it's all held together by worm clamps. Each hose is a separate part, if the hose to the DCCV FAIL change just that hose. Not buy a brand new attachment. I like it.


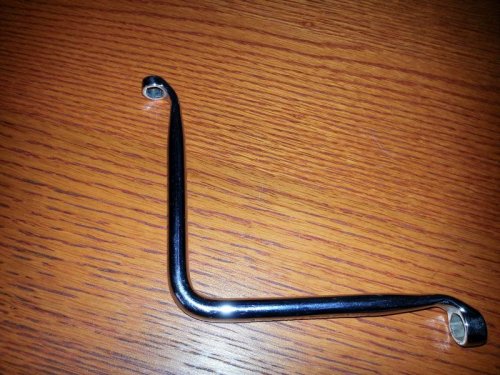
Waiting on my 8mm swivel ratcheting wrench now and this will be my weekend project.

image.jpg


image.jpg


image.jpg
 
Nice ... keep up posted with pics and such. Many of us 1st GEN owners have gone the route of the upgrade Jag Stat housing.

GLWR


----EDIT: ~ just want to add the following:
sorry.gif


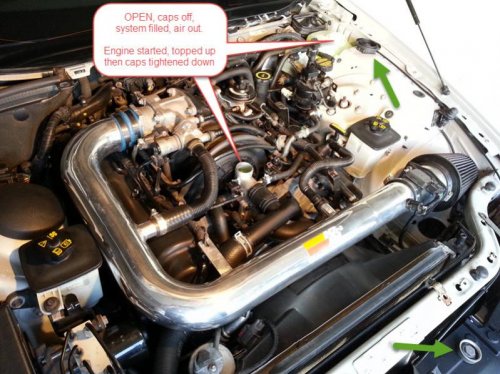
when you go to add coolant back into the system via the top of the fill neck on the Jag Stat,
fill it to just under the rim a bit and gently start massaging/squeezing the rubber cooling hoses
to assist the system with burping the air throughout. It will come back up at the top of the fill
neck at the stat so therefor do not fill it right to the top as it will spill over.

As you squeeze the lines, it will burp the air out and sink the level at the fill neck back down,
keep doing this while every so often add more coolant to the stat housing fill neck.

When you are convinced you've assisted the coolant through and it won't burp much air back out,
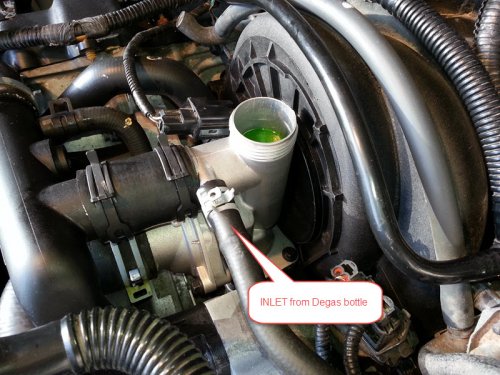
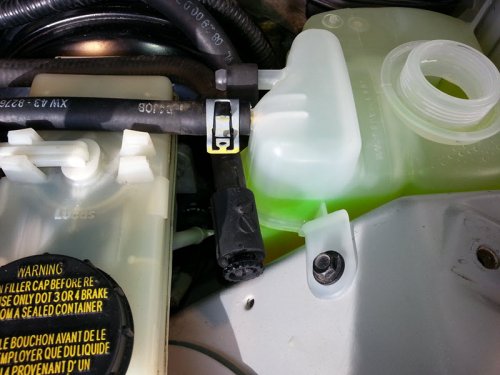
it's time to start filling at the Degas bottle. you'll see the coolant run down the little inlet tube
into the fill neck. Leave your heater drain valve open at the degas bottle, leave the degas cap off for now.

Get someone else to start the car up and hold the RPM up around 2500-2700 and have them turn the
heat right up max with the fan on highest settings, get them to keep holding the RPM's up.

As they do this, you begin to add more coolant to the Jag Stat housing fill neck. On initial start of the
motor the coolant level will drop down inside the neck, you keep filling it to the point where it's right
at the rim where the degas bottle inline tube to Stat and coolant in Stat are level and stays there.

Tell them to keep the RPM's up and steady, not up and down ... important they keep the RPM up steady,
while you continue to fill to the rim at the stat. You can choose to gently squeeze the radiator cooling lines
as you do this, too much and she'll spill over, just enough to see if it want to burp more air or not.

with the RPM's remained steady and you having filled the fill neck to rim cap level it's time to close
the system up by means of tightening the fill neck cap onto the housing. Hand tight for now is fine.

Then keep filling at the degas bottle as the level goes down. Keep the degas bottle cap off for now
and the heater bleed valve open for now as well. While the engine gets up to temperature the level
in the degas bottle will begin to go down, make sure it does not get so low to the point where it
starts to suck air into the system.

Make sure they keep the RPM's up and start to ask them if there appears to be some heat coming
from both facing vents in the center console. Bleed valve will begin to piss coolant out, let it!
should have a catch bucket underneath the car, you'll rinse off everything later.

Eventually the Thermostat is going to pop open once up to temp and allow coolant to now
start flowing through the radiator. Level in degas bottle should relatively stay at same level but
could begin to drop, add coolant if needed.

Once the engine is up to temp and the needle on the dash starts to get to the halfway mark,
it's time to put the cap on the degas bottle with the fluid at the max line.

Observe the drain valve and begin to close this once you are sure it's coming out without spitting air.

Should by now have a closed system and the person in the driver seat holding the RPM's up
should begin to confirm there is plenty of interior heat coming from the vents.

Time to shut her down and let it COMPLETELY cool down! Go wash up, grab a beer, let the engine cool down COMPLETELY!

Once cold, open the degas bottle and fill to max cold line again. Ensure the fill neck cap is in fact on tight.
Bleed valve closed, inspect all around for any coolant leaks, near clamps, bolted down items and such.

You can grab a garden hose and rinse some water down the back near where the bleed valve ran some fluids if need be.

Engine cold, Degas bottle filled back up, bleed valve closed.
Restart engine and get the RPM's up and hold ... wait, let it get up to temp, confirm heat beginning to come from vents.
Open and close drain valve to burp any further air out, keep degas bottle cap closed while bleeding, opening it will reduce
pressure to the system, only open degas bottle when engine back cold.

Go through the routine of warming it back up once more for good measure, add coolant to degas bottle if needed only
when engine is cold. Allow it to get back up to normal running temp and open and close the bleed valve to allow any air to escape.

Should be golden after second or third restart with the bleeding of the air out of the system.


:: if you don't go through the troubles of massaging/squeezing the lines while filling on the initial fill of coolant,
there will be so much air in the system that you'll be bleeding it till the cows come home. Assist it by means
of elevated RPM's, heat/fan on full to pull it through the heater core into the degas escape. Important to close
the fill neck cap at Stat only when engine is getting warmed up and coolant level stays level with top of neck,
closing the cap on the system and not further trapping air into the system.


~ sorry if you already knew all this, we get so many members on here that have trouble bleeding all the air out
correctly and therefore still end up with not enough heat from vents and/or engine overheat due to large pockets of
air trapped within the closed pressurized cooling system. They'll bleed bleed bleed and not get anywhere.


Lots of additional info here: http://www.lincolnvscadillac.com/fo...ng-Climate-Control-System-No-Heat-Information
 
Sorry, that was a bit excessive writing, I get like that from time to time.

I hope you can understand I was aiming to convey the important point of ensuring as little air as possible before closing it up.
By massaging/squeezing the rubber coolant hoses and having the RPM's while you continue to slowly add to the fill neck.
It will stabilize and only then it should get closed up. Soon as you start the engine up it's going to suck it through the system and this is where most folks are introducing large air pockets into the system and then wonder why after the 10th+ rebleed procedure it still overheats. Takes a while to get all that air out the bleed valve.

The above eliminates that to a degree.

Careful to not massaging/squeezing hoses to firmly at once as it will cause the coolant to back up out and overspill at the top/rim of the Stat housing.

Anyhow, sorry ~ I'll shut up now. It's not that complicated of a process.
 
Nice ... keep up posted with pics and such. Many of us 1st GEN owners have gone the route of the upgrade Jag Stat housing.

GLWR


----EDIT: ~ just want to add the following:
sorry.gif


when you go to add coolant back into the system via the top of the fill neck on the Jag Stat,
fill it to just under the rim a bit and gently start massaging/squeezing the rubber cooling hoses
to assist the system with burping the air throughout. It will come back up at the top of the fill
neck at the stat so therefor do not fill it right to the top as it will spill over.

As you squeeze the lines, it will burp the air out and sink the level at the fill neck back down,
keep doing this while every so often add more coolant to the stat housing fill neck.

When you are convinced you've assisted the coolant through and it won't burp much air back out,
it's time to start filling at the Degas bottle. you'll see the coolant run down the little inlet tube
into the fill neck. Leave your heater drain valve open at the degas bottle, leave the degas cap off for now.

Get someone else to start the car up and hold the RPM up around 2500-2700 and have them turn the
heat right up max with the fan on highest settings, get them to keep holding the RPM's up.

As they do this, you begin to add more coolant to the Jag Stat housing fill neck. On initial start of the
motor the coolant level will drop down inside the neck, you keep filling it to the point where it's right
at the rim where the degas bottle inline tube to Stat and coolant in Stat are level and stays there.

Tell them to keep the RPM's up and steady, not up and down ... important they keep the RPM up steady,
while you continue to fill to the rim at the stat. You can choose to gently squeeze the radiator cooling lines
as you do this, too much and she'll spill over, just enough to see if it want to burp more air or not.

with the RPM's remained steady and you having filled the fill neck to rim cap level it's time to close
the system up by means of tightening the fill neck cap onto the housing. Hand tight for now is fine.

Then keep filling at the degas bottle as the level goes down. Keep the degas bottle cap off for now
and the heater bleed valve open for now as well. While the engine gets up to temperature the level
in the degas bottle will begin to go down, make sure it does not get so low to the point where it
starts to suck air into the system.

Make sure they keep the RPM's up and start to ask them if there appears to be some heat coming
from both facing vents in the center console. Bleed valve will begin to piss coolant out, let it!
should have a catch bucket underneath the car, you'll rinse off everything later.

Eventually the Thermostat is going to pop open once up to temp and allow coolant to now
start flowing through the radiator. Level in degas bottle should relatively stay at same level but
could begin to drop, add coolant if needed.

Once the engine is up to temp and the needle on the dash starts to get to the halfway mark,
it's time to put the cap on the degas bottle with the fluid at the max line.

Observe the drain valve and begin to close this once you are sure it's coming out without spitting air.

Should by now have a closed system and the person in the driver seat holding the RPM's up
should begin to confirm there is plenty of interior heat coming from the vents.

Time to shut her down and let it COMPLETELY cool down! Go wash up, grab a beer, let the engine cool down COMPLETELY!

Once cold, open the degas bottle and fill to max cold line again. Ensure the fill neck cap is in fact on tight.
Bleed valve closed, inspect all around for any coolant leaks, near clamps, bolted down items and such.

You can grab a garden hose and rinse some water down the back near where the bleed valve ran some fluids if need be.

Engine cold, Degas bottle filled back up, bleed valve closed.
Restart engine and get the RPM's up and hold ... wait, let it get up to temp, confirm heat beginning to come from vents.
Open and close drain valve to burp any further air out, keep degas bottle cap closed while bleeding, opening it will reduce
pressure to the system, only open degas bottle when engine back cold.

Go through the routine of warming it back up once more for good measure, add coolant to degas bottle if needed only
when engine is cold. Allow it to get back up to normal running temp and open and close the bleed valve to allow any air to escape.

Should be golden after second or third restart with the bleeding of the air out of the system.


:: if you don't go through the troubles of massaging/squeezing the lines while filling on the initial fill of coolant,
there will be so much air in the system that you'll be bleeding it till the cows come home. Assist it by means
of elevated RPM's, heat/fan on full to pull it through the heater core into the degas escape. Important to close
the fill neck cap at Stat only when engine is getting warmed up and coolant level stays level with top of neck,
closing the cap on the system and not further trapping air into the system.


~ sorry if you already knew all this, we get so many members on here that have trouble bleeding all the air out
correctly and therefore still end up with not enough heat from vents and/or engine overheat due to large pockets of
air trapped within the closed pressurized cooling system. They'll bleed bleed bleed and not get anywhere.


Lots of additional info here: http://www.lincolnvscadillac.com/fo...ng-Climate-Control-System-No-Heat-Information
Good write up but I didn't do my bleed out procedure this way. The denau procedure I read told me to install the engine fill cap once filled prior to starting the car at all. Hopefully I didn't F up. Or is the procedure different for the genI V8?
 
Sorry, that was a bit excessive writing, I get like that from time to time.

I hope you can understand I was aiming to convey the important point of ensuring as little air as possible before closing it up.
By massaging/squeezing the rubber coolant hoses and having the RPM's while you continue to slowly add to the fill neck.
It will stabilize and only then it should get closed up. Soon as you start the engine up it's going to suck it through the system and this is where most folks are introducing large air pockets into the system and then wonder why after the 10th+ rebleed procedure it still overheats. Takes a while to get all that air out the bleed valve.

The above eliminates that to a degree.

Careful to not massaging/squeezing hoses to firmly at once as it will cause the coolant to back up out and overspill at the top/rim of the Stat housing.

Anyhow, sorry ~ I'll shut up now. It's not that complicated of a process.

I'm glad you posted this cause the Manual don't tell you that trick ( massage the hose to help purge the air) which is valuable info when you bleeding it by hand and not a machine. Cause at the point of refill is most of the air will be introduce,


On a side note would it be possible to drain the coolant out from the tower as to not have to mess with the radiator drain plug. The radiator is less then a year old I just don't want to touch the plastic plug and it break on me. I was thinking maybe I can siphon the level down from the coolant tree instead.
 
Gen I V8 procedure here:
http://www.lincolnvscadillac.com/tech/Lincoln-LS/CoolingSystemDraining/
The engine fill cap does go back on before starting the engine.

So I did the bleedout procedure correctly by following the denau link? I did squeeze the radiator hoses burping the engine fill neck for a few minutes adding coolant intermittently until it wouldn't take anymore. However... I did not run the engine with the engine fill cap off... I thouht coolant would fly everywhere if I did. Maybe when I get home I'll take the engine fill cap off once the motor is cold, then start it up and see if the coolant level in the neck drops. If it does then I by guess that means I still had air in the system, and I'll add more coolant to top it off while running.
 
So I did the bleedout procedure correctly by following the denau link? I did squeeze the radiator hoses burping the engine fill neck for a few minutes adding coolant intermittently until it wouldn't take anymore. However... I did not run the engine with the engine fill cap off... I thouht coolant would fly everywhere if I did. Maybe when I get home I'll take the engine fill cap off once the motor is cold, then start it up and see if the coolant level in the neck drops. If it does then I by guess that means I still had air in the system, and I'll add more coolant to top it off while running.

You have confused me. This thread was about a gen I cooling system problem, so I responded about gen I. However, if I recall correctly you have a gen II...
 
You have confused me. This thread was about a gen I cooling system problem, so I responded about gen I. However, if I recall correctly you have a gen II...


Yeah Joe I have an 03 v8. I was just wondering why BigRig was advising to fill the engine fill neck with the engine running. Because I followed the Denau procedure for genII v8 and it told me to start by filling the degas tank, and then fill the engine fill as much as possible. Then "install engine fill cap" before starting vehicle.

Basically I was just curious if I should have tried filling the engine fill neck on my genII with the car running as opposed to following the procedure which advises to fill it with the engine off.

I can tell you that the factory procedure works just fine if you follow it, and you don't have any leaks. I doubt that bleeding is your problem.
 
Me too, more or less because I've let the car idle for 5 to 8 minutes or so a few times now, and opened the heater air bleed to see if I'd get an air purge (which would inform me that I have air in the system), and I've gotten nothing but steady coolant stream. So yeah you're probably right Joe, I was just inquiring on this procedure by Rig.

On a side note, I've taken several 30minute trips since that overheat after installing new radiator hoses and haven't had issues since. Maybe when it overheated it was just burping out a remaining air pocket? Probably unlikely though
 
As long as it's understood, this is how I went about it on my 01 V8 and I myself clearly understand it reads in the manuals
to put the cap on after filling to the top of the rim on the Stat housing. Not saying it's wrong, not saying others are wrong.

I just know from previous work that it assist the matter of burping the air out as it's running while it's beginning to pull it through.

In the olden days, one would remove the rad cap, fill to the top at the rim, start motor, up the RPM's and see the level drop.
within the first few minutes as the motor begins to get up to temp, one could squeeze the hoses and burp any air out and
continue to top of the coolant level with the top of the rad opening and then twist on the cap.

I'm just saying, (above) after I had dumped all the coolant at the lower rad valve out and had my whole cooling system in a million pieces, when it was time to fill the system with fresh coolant, I could hear it running down into the motor and when it then began to back up at the fill neck, if I squeezed the hoses, she'd push some air out the top at the fill neck, she'd burp and the level would drop. I filled it to the top and as the motor got started up with some revs, she's drop in level again.

I did it in this fashion as to avoid further air going back down into the system. when the motor starts to warm up, YUP the cap better be on and tight.

Not disputing this ... not saying others are wrong, only pointing out this is how I went about it and if I managed to get it bleed by the second cold restart with little to no air coming out of the bleed valve, not overheating, plenty of heat from the vents and level in degas staying the same, then how wrong did I really do this in utilizing this method.

and to this date ... no leaks, no overheating, lots of heat at vents. (mind ya I did the DCCV and Aux pump at the same time.)

also, please don't get me wrong, starting the motor with the fill cap off and continuing to burp the hoses, we're not talking half hour here, two minutes tops, soon as she stopped dropping in level, filled to the rim with the RPM's up and sucking flow from the degas bottle, the cap was added.

In my method and opinion it merely assists the matter of ensuring it's not sucking further air into the loop.

It worked for me, didn't have to rebleed it a hundred times, I was good after the second restart, third cold start up system was as intended. hasn't failed since.

Up to you.
 
... was just wondering why BigRig was advising to fill the engine fill neck with the engine running ...

Ugh, I knew this would go wrong.

I didn't say start motor, fill system. I said, fill system, squeeze hoses, burp air out top of neck, top up, start motor, rev up RPM's steady, continue to top up to level, close with cap.

If the coolant in the degas is at level it will trickle in on the side inlet at the neck anyhow. topping it up at the fill neck while it's running just speeds up the process and ensures no large air pockets get sucked in. the feed from the degas bottle is so small it couldn't keep up as quick as you could top up then close the system with the cap when at level.


fill.jpg


1.jpg


2.jpg


Done, coolant level in degas bottle at correct COLD level.

done.jpg


After third restart, no leaks, not overheating, heat from vents, system functioning as design intended.

3.jpg


1.jpg


2.jpg


3.jpg


fill.jpg


done.jpg
 
Hey Rig, I wasn't criticizing you or critiquing your method. I was simply inquiring because of the issues I've had with my LS and was considering trying your procedure for bleeding.

I was just speculating because I remember when I overhauled my system last August I had forgot to attach a small hose on the main plastic body. And upon start up it threw coolant everywhere. So I was under the impression that starting the engine with the fill cap off would result in coolant flying all over the place.
 
A note about the worm gear clamps. I recently saw on MotorWeek Goss's Garage that one should be very careful when using worm gear clamps on plastic radiator necks. This is because of the pressure point where the worm gear bolt is deforms and ultimately cracks the plastic neck. The preferred ones are the OEM squeeze clamps; see pictures in BigRigLS's post, all the clamps are the "squeeze" type.
 
A note about the worm gear clamps. I recently saw on MotorWeek Goss's Garage that one should be very careful when using worm gear clamps on plastic radiator necks. This is because of the pressure point where the worm gear bolt is deforms and ultimately cracks the plastic neck. The preferred ones are the OEM squeeze clamps; see pictures in BigRigLS's post, all the clamps are the "squeeze" type.


Thanks for the info I'll make note of that, and grab some clamps from the dealer. When I go pick up a new thermostat.

Also on this good year hose the T split is way more thicker and feel more durable then the OEM style hose.
 
A note about the worm gear clamps. I recently saw on MotorWeek Goss's Garage that one should be very careful when using worm gear clamps on plastic radiator necks. This is because of the pressure point where the worm gear bolt is deforms and ultimately cracks the plastic neck. The preferred ones are the OEM squeeze clamps; see pictures in BigRigLS's post, all the clamps are the "squeeze" type.

It's only a problem for people that crank the worm clamp down until they can't turn the wrench anymore. When properly tightened, worm clamps work great and don't crack the plastic. I've found that there is no problem when you get the clamp ran up that if you use a 1/4 inch socket wrench, and tighten it down with three fingers right at the head of the tool, that when it just starts to resist turning that it's almost tight enough. Just a hair more and it's golden.
 
Ok fellas I got the job done, at first I thought I didn't tighten the back bolts down good enough but when the engine got hot, I notice the coolant was just run off from filling,
Heat blows hot, now I'm waiting on it to cool back down, couldn't get pics yet cause it started pouring down raining, on me. But I will take some pics of the old parts, and the new parts when the rain lets up.

Also the T fitting on the good year upper radiator hose is metal, I'm glad I choose it.
 
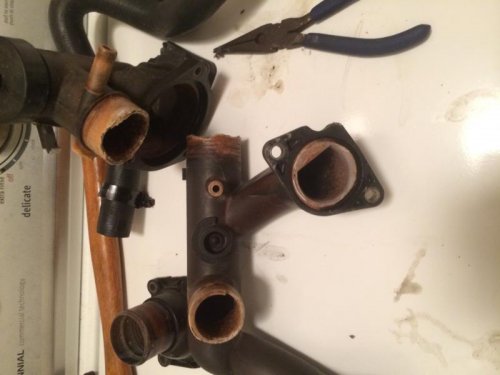
image.jpgimage.jpg

These are the old part after drying out its a wonder the didn't melt in my hand,
I could easily break parts of the plastic with minimum effort.

Wonder who said " hey let's use all plastic" when the design team started to design and build this car.

image.jpg
 
^ yup, it deteriorate as the vehicle ages, it was designed with an all plastic cooling system to keep the overall weight down.

When I tore into mine, an 01 V8 Sport, it wasn't actually that bad as far as breaking apart but I could see the brown pitting on the insides of all the parts. Still have the old stock plastic thermostat housing, kept it as a spare as it wasn't all the bad, neither was the inlet tube. I did eventually get the fill cap off the plastic version which I couldn't get off when it was in car. Glad I went with the all Aluminum Jag Stat housing. Cheaper and well worth it.

Any further pics BlueBerry? from the engine compartment?

Kudos on repair btw.

Thanks for the kudos wasn't as bad as I thought, it took me about a a hour or two to get all the parts off and back on. The rear bolts was the pain trying to edge them out. If I had to tell some one how to complete this task I would surely tell them take the time and inch them bolts out a lot less headache them removing the plenum. Will take pictures when I wake up it should not be raining by then.

It's funny cause I was looking over the system afterwards trying to see is the electric coolant pump was working I seen a clamp that was at the bend in the hose that comes from the coolant tree to the aux pump and thought how did that get there.

It's been like that for almost a year when I change my radiator, I bust out laughing. Thinking to myself I was just glad the radiator was in and forgot to re clamp that hose.

That job gave me hell I went from the top. Then read online where it said drop from bottom. I think I threw a few tools at the old one. Lol
 

hehehe, ya I remember the fan shrouding cost me a few scrapes on the inside of my arm when replacing the DCCV and Aux pump.

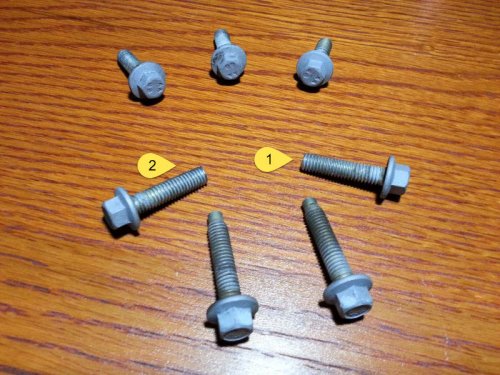
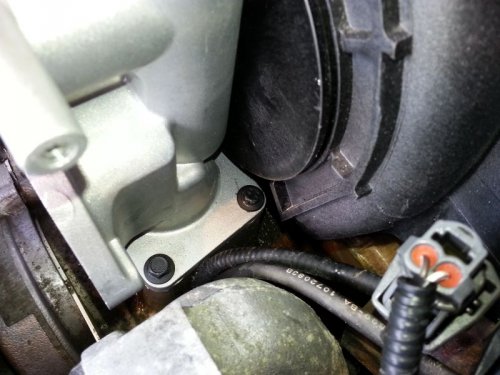
I opted to cut down the bolts for the two most rear set ones. Fit back in easier that way.

statbackbolts_tool.jpg

statbackbolts1.jpg

statbackbolts2.jpg

statbackboltscutdown.jpg

statbackbolts_in1.jpg

wasn't that bad of a job.

statbackbolts2.jpg


statbackbolts1.jpg


statbackbolts_tool.jpg


statbackboltscutdown.jpg


statbackbolts_in1.jpg
 
Went out to re-bleed the system and it's coming along I must have had a ton of air in the system, when I opened the heater bleed a little air came out. What I did was went to squeeze the upper hose and started the car let it get to temp gave it gas but noticed this time instead of having to get the RPMS UP TO 2000 the heat started really blowing at about 1500, I let it run for about three mins. Brought it back to idle. Waited then went to open the heater bleed and a lot of air started spitting out, which I thought was perfect. Now I'm letting it cool back down. And see how much more come out.
 
Well just changed out the degass bottle wasn't as hard as I thought it would be. I took the wheel off and replaced the factory clamp with a worm clamp.

Now on to my new problem bled the system it's holding pressure, finally got that stream of coolant from the bleed screw. Now I have absolutely no heat. It heated up fine when I bled the system. Went out just now at 4 in the morning, took her for a spin and the heat is ice cold on 90 degrees, get out check the heater core hoses and they are cold to the touch.

Looks like the DCCV took a crap on me. Will be replacing that soon. And the aux pump.
 

Members online

Back
Top