My LS' Progress

Sorry for the late response.

Because the reverse lamps have non-clear lenses, the T15's effectiveness is reduced as the light is scattered. If the lenses were clear, that would be a different story. Give them a try, they are only $20.

I am still running the VLEDs as I prefer the light output.

Gotcha, thanks. After reading about soldering in resistors, my enthusiasm is a bit diminished. I thought the VLEDs were going to be plug and play. I have the skills to solder resistors, but not the motivation.

Your darkened tail lights look cool. Looks like a 'detective' car.
 
Haven't done much modding in a long while, mostly maintenance and fixing things that broke. With that said..


Exhaust
Earlier this year, I decided to hack off the 3rd cat and resonators, and add in an X-pipe to compliment my Magnaflow mufflers. Kept stock tubing size, which seems to have created for a more unique sound than I've heard in other videos. I've received many compliments from coworkers on how good it sounds. Emissions test is also coming up soon, hopefully I'll pass. :)


Before | After
WP_20140419_002_s.jpg
WP_20140419_003_s.jpg


Some quick YouTube clips made with my dashcam right after I had it done, audio sucks due to internal mic. Please excuse the music in some of them:
Underpass 1 (Dashcam): youtu.be/1AhaJRpWvP0
Underpass 2 (Dashcam): youtu.be/GwfkyJUHAc4
Quick Clip (Dashcam): youtu.be/aTPGd3n8jZ4

GoPro clip after the exhaust has settled a few months later:
[video=youtube;pKcECm-aSC4]https://www.youtube.com/watch?v=pKcECm-aSC4[/video]

Quick drive off:
[video=youtube;KIH5sitNCPw]https://www.youtube.com/watch?v=KIH5sitNCPw[/video]

Somewhat of a boring video, but gives a good idea of how it sounds in motion. Skip to near the end for the best part:
[video=youtube;qWsitvLfMnc]https://www.youtube.com/watch?v=qWsitvLfMnc[/video]


Cost: $350. Well worth it!
 
Maintenance - Brakes

Next up, my passenger rear brake caliper had an internal failure: the parking brake mechanism no longer fully retracted and caused a lot of drag on the brakes. $160 later, minus a core charge, it was all fixed up (DIY). Also decided to paint my calipers black with Tremclad (Rustoleum in the US) rust paint after reading some positive feedback and seeing how cheap it is. 4 months later, it still looks new.

IMG_20140608_102818.jpg


IMG_20140615_100750.jpg


Sidenote: I am never buying shitty rotors like that again.

Cost: $100


Maintenance - AC Compressor

In the middle of the summer, by pure chance, I discovered my AC compressor had developed a leak. Thankfully I caught it in time so I decided to just replace the compressor and receiver/dryer. I used Four Seasons branded parts off RockAuto, plus Motorcraft PAG oil and o-rings from the dealer. Install went smoothly, it's not too hard of a job. I had the system evacuated at a shop prior to the repair, and vacuumed + re-charged after replacing the parts myself.

Car at the shop for a vacuum + recharge:
WP_20140825_001.jpg


I also cleaned my condenser with NuBrite. Just spray it on, allow to foam, and rinse off.
IMG_20140824_085743_s.jpg


IMG_20140824_085758_s.jpg


Years of garbage coming out:
IMG_20140824_085828_s.jpg


Cost: $500
 
Paint - Trunk Lid

Since buying the car in 2010, it already had some preexisting aluminium corrosion taking place on the trunk lid. Over the years it has gotten quite bad, so I got myself another lid and had it stripped & painted (thanks Tony Starks) at a local shop. While at it, I also restored my backup camera which was destroyed by salt, got a fresh set of plates and slightly smoked my reverse lamps.

DSC_3988_s.jpg


Cost: $400
 
Maintenance - Cooling System Overhaul

Since I've decided to keep the LS for a while longer and with winter approaching, it was time to tackle one of the most dreaded points of failure on these cars: the plastic cooling system.

Partslist:
NamePart #Qty
Upper Radiator Hose3W4Z-8260-BB1
Lower Radiator Hose3W4Z-8286-CB1
Plastic Elbow2W9Z-9N499-AC1
Main crossover/T3W4Z-8548-AD1
T-Stat Housing3W4Z-8592-AA1
T-Stat2W9Z-8575-AB1
O-Ring: Block -> ElbowXW4Z-8255-CA1
O-Ring: Elbow -> Main Crossover/TW707299-S3001
O-Ring: Main Crossover/T -> Block96JV-8255-CB2
O-Ring: Main Crossover/T -> T-Stat Housing2W9Z-8590-AB1

Thanks to SoulSoak and other LvC members for compiling this list. I provide full P/Ns. Most items were purchased from RockAuto. Upper hose, elbow and crossover pipe from the dealer at wholesale pricing.


Degas was already preventively replaced last year, along with the idler pulley, belt and tensioner.

DSC_3634_s.jpg


DSC_3689_s.jpg


DSC_3706_s.jpg


Parts laid out:
DSC_4009_s.jpg


DSC_4011_s.jpg


T-stat and housing:
DSC_4016_s.jpg


Assembled:
DSC_4018_s.jpg


Main elbow, showing the shorter bolts I intended to use. Big thanks to Andrizzle for letting me know me the t-stat housing bolts are just the perfect length to fit here. No cutting of new bolts necessary!
DSC_4022_s.jpg


DSC_4026_s.jpg


Parts laid out:
DSC_4029_s.jpg


TB removed:
DSC_4034_s.jpg


As I started on the housing, I noticed something was off. One of the tabs holding the thermostat in place was broken. This explains the long warmup times in cold weather:
DSC_4039_s.jpg


DSC_4040_s.jpg


Getting the lower hose off the oil cooler WAS A BITCH.
DSC_4042_s.jpg


I chose to go to the TB route and cut, as opposed to removing the entire manifold.
DSC_4043_s.jpg


I broke it down to about two days of work, not too bad of a project. Upper and lower house and the plastic elbow didn't show any signs of fatigue, but I am glad they were all replaced anyway. I bled the car and downloaded an OBD2 app for my phone to monitor coolant temperatures for the new fays days. All is good.

A big thank you goes out to SoulSoak, TooManyToys, joegr, Andrizzle and other members who of shared tons of valuable information on here, and of course owlman for uploading the service manual online.


Cost: $450
 
Total cost of maintenance, repairs and modifications this year is almost $2000. This could have been easily 2-2.5x if I didn't DIY. Never the less, I have very much enjoyed owning this car so far.


DSC_4045_s.jpg


DSC_4055_s.jpg


DSC_4057_s.jpg


DSC_4068_s.jpg
 
Hell of an update.

Looks good as always, after seeing the dirt, maybe a radiator cleaning is in order for me, too.
 
Ok, now I'll give you the full asking price! j/k, nice work M4rk
 
Holy update Batman! Nice work man.


I chose to go to the TB route and cut, as opposed to removing the entire manifold.
DSC_4043_s.jpg


Hey been following your posts and I got to say she looks beautiful! Great job with her, you gave me hope on fixing mine up. I was hoping you can help me out please, sorry for taking up any of your time and any help would be greatly appreciated.

I bought my 2006 LS last week 146k on it and it overheated on me. I've been researching as much as I could so i'm changing the thermostat, the housing for it, the back part of the housing. I want to change the dreaded 9N499 elbow piece behind it but im not sure how to go about cutting the bolts with a rotary tool. I saw that you did a great job hoping you can help me out. Do I just unscrew as much as i can and cut the screw in half and use a pliers to spin the remanding piece out...? I'm a bit lost. Also is it okay to be making sparks under the hood when cutting the bolts off? Should I be shutting of a gas valve or something? Don't want to start a fire. This is literally my first time working on a car, sorry if my questions seem dumb. Again thank you so much for taking the time to read this and any help you can give me!!
 
Why so resistant to taking the intake manifold off? It's not hard, and then you wouldn't have to remove the throttle body from the intake. If you remove the manifold, you can vacuum out the dirt that is going to fall into the intake ports. (I suspect this happens when you just loosen it and lift it slightly too, but this way you can get it back out.)
 
The original thread OP has gotten rid of his LS (I think BigRigLS has it?).

But yes, you back them up as much as you can, then slice them off. I used a cutting wheel on a dremel. Sparks under there are no problem, just wear eye protection.

Be sure when you replace the bolts, to use the same bolt part# from the thermostat housing assembly - they are the perfect length to use correctly.
 
^ Correct, my wife and I ended up buying this very well maintained LS from M4rk, however he still lurks in the background cuz he misses his LS and all of us. I can't help but smile as I review back on his posts of the work he did to this LS, gives me a whole lot of less worries with all the new parts he added. Meticulous little fella he was. Kudos to him for sure, it's a top notch LS with everything refreshed. Does need a couple of UCA in the rear along with Toe adjust end linkages, which I've been talking about ordering forever. I'll certainly have a look at his extensive write up for when I need to do my 04 LSE cooling system re&re.

+1
 
Thank you both Joegr and Andrizzle for taking the time to read and help me out. I really really appreciate your quick response!! My car is in pieces and my only transportation so im stuck till i fix it and haven't had a single day to drive this beautiful car since I got her.

I dont want to mess with the manifold because looking at this write up it looks like a ton of work and im not to familiar with engines unless im looking at the wrong write up? Not some one to shy from hard work just dont want to have more options of things going wrong.

When I cut the back two bolts do I need to remove the Throttle body as well? I got off both front and back of the housing up till the elbow off without removing it the throttle body. When I cut the bolts do I cut half the bolt and unthread the rest by hand? Is any dermal ok to use, any specific size head for it? Thank you I will definitely get the bolt for the housing to replace these. Sorry for all the questions
 
It (manifold removal) looks worse than it is. It's just some grunt work. No special tools (other than fuel line disconnect $5 tool) and no special knowledge required.

If you don't remove the intake manifold, then yes you have to remove the throttle body from the manifold. It's not difficult either, but be careful of the gasket between the intake and the throttle body. You can't get a replacement one anymore.

Make sure you get the replacement bolts before you cut the ones you have. I'm sure that once you cut the bolts you can lift the pipe off and it will be easy to get the rest of the bolt out.

Note: On one (2006) of my two LSes, the throttle body heater hose was starting to fail. This is very very difficult to see and to replace without removing the manifold. (However, it was and still is fine on the other LS (2004). I have no idea how often this happens.)
 
Thanks for the heads up. When I took the coolant outlet pipe out, the back part that connects to the elbow (9N499) has a white goo type substance on it. Cant tell if it was some type of sealant used to stop a leak or something or if its supposed to be sealed up like that from factory or possibly the plastic disintegrating from the part. Am I supposed to seal it up with anything besides the gaskets? How important is it to torque the bolts on exactly at 89 lb-in, I ask because I do not own one and wondering if I really need to spend the extra $50. I read somewhere that if you add an extension bar the actual torque changes is this true?
 
Torque on those bolts is not critical. You want it tight enough that they won't vibrate loose, and not so tight that it cracks the plastic.
The white stuff is residue from the coolant leaking there for a while. There is no sealant to add, but be sure to lubricate the seals before installation. Coolant or silicon spray works for that. I wouldn't use oil (but it might be okay).
If you are going to keep this car, you will need a couple of torque wrenches and some other tools...
 
I read somewhere that if you add an extension bar the actual torque changes is this true?

Cheater bar or or socket extensions? The extensions between the ratchet drive and the socket don't change anything. If you are using a torque wrench set to 89in-lbs, no amount of cheater bars will change the torque at which it clicks. What changes is the amount of force with your hands.

Let's look at a ft-lbs wrench to make it easier. If the handle is 1ft long and you want to torque something to 50ft-lbs, it will take 50lbs of force from your hand. If it's a 2ft handle, it will only take 25lbs force. It's a linear calculation of torque/length. Length(ft)*Force(lbs)=Torque(ft*lbs). But, as stated above, none of that needs to be calculated because the wrench head itself will always click at the same torque.

Handle length makes a difference when you get into the 100ft-lb+ range (installing lug nuts removing rusted bolts, for example) because you may not be able to apply the needed force to the wrench depending on strength and location.
 
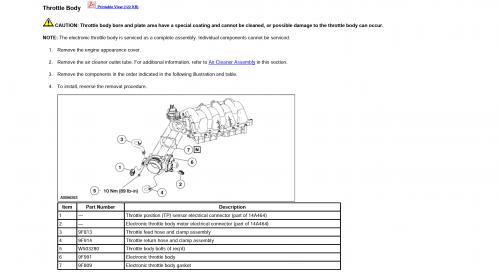
Throttle Body Removal

Wow thanks for the info LSFRANK makes me wish I got on this forum a lot sooner. Sorry for the thread jack but I need help and these guys know what they are talking bout.

Is this the right write up for the removal of throttle body...? I feel like it should go one more step all the way to the intake manifold like you said? Does anyone have the write up for this thanks again!

If you don't remove the intake manifold, then yes you have to remove the throttle body from the manifold. It's not difficult either, but be careful of the gasket between the intake and the throttle body. You can't get a replacement one anymore.


Screenshot_2015-12-24-16-28-41.jpg

Screenshot_2015-12-24-16-28-41.jpg
 

Members online

No members online now.
Back
Top