I have the covers off ready to replace the secondary chains and tensioned. Driver side tensioner failed and it looks like the cam jumped a tooth, the cam flats are not lined up. I thought I could cut the chain off and install the new without the special tools because I bought chains with master links and make sure the flats are lined up? Do I need the tools? I've been reading different answers on here. Will the cam try to flip if I take the chain off? Only removing the secondary chain.
You are using an out of date browser. It may not display this or other websites correctly.
You should upgrade or use an alternative browser.
You should upgrade or use an alternative browser.
Secondary chain replacement and tensioners
- Thread starter Cams-76
- Start date
I just replaced the secondary chain and tensioner without the tools. I marked the cams in several spots to make sure it was lined up 100 percent. With alot on messing, you can install a new tensioner without removing the cam gear.
Another thing, if the cam flats are lined up they are good right? There's no way for the cam to be 360 degrees off is there? I don't think there is any way the cam that has a chain to the crank moved I think the other cam is off.
When removing the exhaust cam how do I mark it? I don't understand what I need to mark if I line the the cam flats back up? Is there a trick to bolting the cam back down? I remember reading somewhere that bolting the cam back in the same spot is very important?
RigsLS
Dedicated LVC Member
- Joined
- Mar 10, 2012
- Messages
- 7,756
- Reaction score
- 532
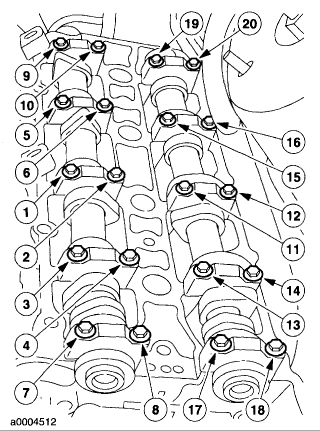
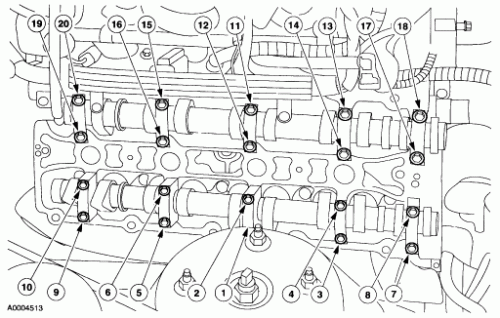
Everything you take out on the exhaust cam has to go back in the same way, including the bolts, they have to be torqued back down in a certain order and must be torqued to spec and then an extra 1/4 turn afterwards.
It has to be seated the way it came out or there will be troubles.
Valve cover bolts 89 in.lb
Camshaft Bearing Cap Bolts
Stage 1 Hand Tighten
Stage 2 6 Nm (53 in.lb)
Stage 3 Additional 90 degrees


If you are not lifting the intake cam then you skip those sequential numberings and keep the count on only the exhaust cam.
Do yourself a favour and make a cardboard cut out, trace the top of the entire cam and make holes, place all your bolts into those holes as they came out. The cam bearing caps are numbered and have to go back the same order and orientation they came out.
It's all in how it was seated and worn until this point in time, you put it back out of original and it will not like the offset of how it sits.
All Bolts and Bearing Caps *have* to go back in their original locations.

Good Luck !


It has to be seated the way it came out or there will be troubles.
Valve cover bolts 89 in.lb
Camshaft Bearing Cap Bolts
Stage 1 Hand Tighten
Stage 2 6 Nm (53 in.lb)
Stage 3 Additional 90 degrees


If you are not lifting the intake cam then you skip those sequential numberings and keep the count on only the exhaust cam.
Do yourself a favour and make a cardboard cut out, trace the top of the entire cam and make holes, place all your bolts into those holes as they came out. The cam bearing caps are numbered and have to go back the same order and orientation they came out.
It's all in how it was seated and worn until this point in time, you put it back out of original and it will not like the offset of how it sits.
All Bolts and Bearing Caps *have* to go back in their original locations.
Good Luck !
oddball
Dedicated LVC Member
Yes, keep the caps in order and in the same orientation.
You just need to line up the flats.
Not that you SHOULD loosed the exhaust sprocket, attach chain, apply tension then tighten. That gets it in the right place. However, you can just bolt it back up as-is and it should be within a few degrees. The issue is the new chain is a different length (very very minor) than the old, so the sprockets won't be in precisely the right alignment. Note that the exhaust sprocket is not keyed in any way - it just hangs on via the bolt.
torani608
New LVC Member
Take the tensioner off and unbolt the cam and just hold it there in place while you slip the new tensioner in then put the cam back down and tighten to torque specs...if it has jumped a link slip the chain off while the cam is unbolted and set it to spec...did my passenger side about 2yrs ago
RigsLS
Dedicated LVC Member
- Joined
- Mar 10, 2012
- Messages
- 7,756
- Reaction score
- 532
So I should put the new chain on first then the tensioner? I'm guessing the orang tack in the tensioner is keeping it collapsed for install?
Unlike a grenade in this case you pull the pin afterwards.

be sure to get your left and rights in correctly, they are left and right side specific.
Take the tensioner off and unbolt the cam and just hold it there in place while you slip the new tensioner in then put the cam back down and tighten to torque specs...if it has jumped a link slip the chain off while the cam is unbolted and set it to spec...did my passenger side about 2yrs ago
+1, like that!
and 9 out of 10 times it's the exhaust cam that skips.
Ok I am getting it all together. I rotated the engine around with a socket wrench and it looks good. Only thing that looks odd to me is the passenger side has slack in the top of the chain. I have the little keeper out of the new tensioner but its got slack on the still. Is it supposed to? Bottom is tight. I have the tensioners in correctly I think, they were labeled on the bags. Pas side puts tension downward and the drover side upward.
Telco
Dedicated LVC Member
Will the chain position the cam where it wants it forward and backward wise? Seems like it would self align?
No, the relationship between cam and chain is fixed. If the chain is installed one tooth off, it will be one tooth off forever. The only way to fix is to install correctly. And, if you rotate the engine around by hand 720 degrees, then the cams should be lined up exactly where they were when you first started. They are also designed to only run in one direction as the engine only ever rotates in one direction. If it's trying to go backwards something is about to get spectacular under the hood, but you aren't going to like it.
Ok I am getting it all together. I rotated the engine around with a socket wrench and it looks good. Only thing that looks odd to me is the passenger side has slack in the top of the chain. I have the little keeper out of the new tensioner but its got slack on the still. Is it supposed to? Bottom is tight. I have the tensioners in correctly I think, they were labeled on the bags. Pas side puts tension downward and the drover side upward.
Not completely sure on these multichain engines, but I would think that if you replaced both chains that both sides should have about the same amount of slack. And if you are replacing one, I would replace them all because you'll almost certainly be back in there within a month or two to replace whatever chains did not get replaced since the new chain will be tighter, and will place more stress on the old chains than they are used to. Plus, if there's a noticable amount of slack between the new and old, that just shows the stretch in the old chain. If both chains are new, then I'd check that the tensioners are installed correctly. Once again though, I've never actually done one. I've done regular single cam timing chains, and multicam timing belts where one belt ran the whole thing, but never a multi-chain job.
Last edited:
joegr
Dedicated LVC Member
... And, if you rotate the engine around by hand 360 degrees, then the cams should be lined up exactly where they were when you first started. ...
Actually no, you have to rotate the crankshaft 720 degrees (two turns) to rotate the cams 360 degrees (one turn). The crankshaft makes two full turns for every one full turn of the cam shafts.
Telco
Dedicated LVC Member
THPPPT! Right, cam travels half speed to the crank. Sorry, forgot that little detail, but it's an important one.
Ok I understand. The flats are all lined up. I'm just worried about the pass side chain slack. With it all bolted in I turned the engine over rotating the cams 360 and there is still some slack. I don't get it new chains and tensioners. Maybe it's fine?
oddball
Dedicated LVC Member
The tensioners use oil pressure to actually stretch the chain, so some slack on install is normal.

