With a known good battery in, clear the codes and see if any of the low/high volt codes come back.
B2116 & B2112 - This is probably a short in the circuit for the key lock/unlock switch in the driver's door latch assembly.
B3 CHECK CIRCUITS 31S-AA78 (BK/BU) AND 31S-AA79 (BK/WH) FOR A SHORT TO GROUND
- Key in OFF position.
- Disconnect: Driver Door Lock Unit C525.
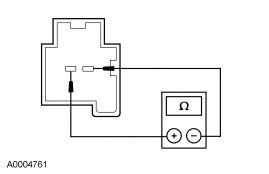
- Measure the resistance between the driver door lock unit C525-5, circuit 31S-AA79 (BK/WH), harness side and ground; and between the driver door lock unit C525-7, circuit 31S-AA78 (BK/BU), harness side and ground.
- Are the resistances greater than 10,000 ohms?
B1309 & B1341 -
C4 CHECK CIRCUITS 8-AA10 (WH/BK) AND 8-AA11 (WH/VT) FOR A SHORT TO GROUND
- Disconnect: DDM C501d.
- Measure the resistance between the DDM C501d-23, circuit 8-AA10 (WH/BK), harness side and ground; and between the DDM C501d-24, circuit 8-AA11 (WH/VT), harness side and ground.
- Are the resistances greater than 10,000 ohms?
- C8 CHECK FOR CORRECT DDM OPERATION
- Disconnect all the DDM connectors.
- Check for:
- corrosion
- pushed-out pins
- Connect all the DDM connectors and make sure they seat correctly.
- Operate the system and verify the concern is still present.
- Is the concern still present?
B1420, B1424, B1416 - (not all the windows)
D1 CHECK THE VOLTAGE TO THE LH REAR OR RH REAR WINDOW CONTROL SWITCH
- Key in OFF position.
- Disconnect: Inoperative Rear Window Control Switch C701/C801.
- Key in ON position.
- NOTE: Make certain the window lock-out switch is in the UNLOCK position.
- Measure the voltage between the inoperative rear window control switch C701-3, circuit 7-AJ14 (YE/BU) (LH rear), harness side and ground or C801-3, circuit 7-AJ24 (YE) (RH rear), harness side and ground.
- Is the voltage greater than 10 volts?
Yes
GO to
D2 .
No
REPAIR the circuit. CLEAR the DTCs. REPEAT the self-test.
D2 CHECK THE GROUNDS TO THE REM
- Key in OFF position.
- Disconnect: REM C420f, C420g.
- Measure the resistance between the REM C420f-3, circuit 31-DK30 (BK/OG), harness side and ground; and between the REM C420g-2, circuit 31-DK30 (BK/OG), harness side and ground.
- Are the resistances less than 5 ohms?
Yes
GO to
D3 .
No
REPAIR the circuit(s) as necessary. CLEAR the DTCs. REPEAT the self-test.
D3 CHECK CIRCUITS 8-AJ14 (WH/BU), 8-AJ24 (WH), 10-AJ14 (GY/VT) AND 10-AJ24 (GY) FOR AN OPEN
- Disconnect: REM C420c, C420d.
- NOTE: If the LH rear window motor is inoperative, follow Step 2. If the RH rear window motor is inoperative, follow Step 3.
- If the LH rear window motor is inoperative, measure the resistance between the LH rear window control switch C701-5, circuit 8-AJ14 (WH/BU), harness side and the REM C420c-24, circuit 8-AJ14 (WH/BU), harness side; and between the LH rear window control switch C701-2, circuit 10-AJ14 (GY/VT), harness side and the REM C420c-22, circuit 10-AJ14 (GY/VT), harness side.
- If the RH rear window motor is inoperative, measure the resistance between the RH rear window control switch C801-5, circuit 8-AJ24 (WH), harness side and the REM C420d-7, circuit 8-AJ24 (WH), harness side and between the RH rear window control switch C801-2, circuit 10-AJ24 (GY), harness side and the REM C420d-20, circuit 10-AJ24 (GY), harness side.
- Are the resistances less than 5 ohms?
Yes
GO to
D4 .
No
REPAIR the circuit(s) as necessary. CLEAR the DTCs. REPEAT the self-test.
D4 CHECK THE INOPERATIVE WINDOW CONTROL SWITCH
- Connect: REM C420c, C420d, C420f, C420g.
- Key in ON position.
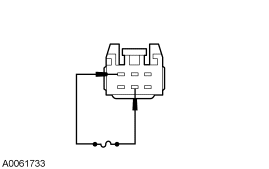
- Connect a fused (5A) jumper wire between the inoperative window control switch C701-3, circuit 7-AJ14 (YE/BU) (LH rear), harness side or C801-3, circuit 7-AJ24 (YE) (RH rear), harness side and C701-5, circuit 8-AJ14 (WH/BU) (LH rear), harness side or C801-5, circuit 8-AJ24 (WH) (RH rear), harness side. The window motor should operate in the up direction.
- Connect a fused (5A) jumper wire between the inoperative window control switch C701-3, circuit 7-AJ14 (YE/BU) (LH rear), harness side or C801-3, circuit 7-AJ24 (YE) (RH rear), harness side and C701-2, circuit 10-AJ14 (GY/VT) (LH rear), harness side or C801-2, circuit 10-AJ24 (GY) (RH rear), harness side. The window motor should operate in the down direction.
- Does the window operate correctly?
Yes
INSTALL a new rear window control switch. REFER to
Window Control Switch in this section. CLEAR the DTCs. REPEAT the self-test.
No
GO to
D5 .
D5 CHECK THE INOPERATIVE WINDOW MOTOR CIRCUITS
- Key in OFF position.
- Disconnect: REM C420f, C420g.
- Disconnect: Inoperative Window Motor C703/C803.
- NOTE: If the LH rear window motor is inoperative, follow Step 4. If the RH rear window motor is inoperative, follow Step 5.
- Measure the resistance between the LH rear window motor C703-1, circuit 35-AJ13 (VT/BU), harness side and the REM C420f-1, circuit 35-AJ13 (VT/BU), harness side; and between C703-2, circuit 34-AJ13 (BU/RD), harness side and the REM C420f-2, circuit 34-AJ13 (BU/RD), harness side.
- Measure the resistance between the RH rear window motor C803-1, circuit 35-AJ23 (VT/WH), harness side and the REM C420g-3, circuit 35-AJ23 (VT/WH), harness side; and between C803-2, circuit 34-AJ23 (BU/OG), harness side and the REM C420g-1, circuit 34-AJ23 (BU/OG), harness side.
- Are the resistances less than 5 ohms?
Honestly, all of the above have one thing in common - The harness to and in the driver's door. I'd start with it.
B1261 - sun load - This is in the assembly with the flashing PATS light and the light sensor for the auto headlights.
B1967, B2429
E1 CHECK THE SENSOR RESISTANCE
- Key in OFF position.
- Disconnect: Sensor.
- Refer to the table and disconnect the sensor associated with the DTCs recorded from the DATC module self-test:
Sensor Condition DTC Connector
EVAP air discharge Open B1946 C296
EVAP air discharge Short B1947 C296
Driver air Open B1966 C255
Driver air Short B1967 C255
Passenger air Open B2428 C235
Passenger air Short B2429 C235
- Measure the resistance between sensor terminals.
- Is the resistance within the specified values for these temperature ranges: 10-20°C (50-68°F) 37,000-58,000 ohms; 20-30°C (68-86°F) 24,000-37,000 ohms; 30-40°C (86-104°F) 16,000-24,000 ohms?
It seems to be very common for any or all of these three sensors to fail. They are easy to change out. Until fixed, you probably won't get good heating or cooling.
B1567
B1 MONITOR THE INSTRUMENT CLUSTER HIGH BEAM INPUT STATUS PID
- Key in ON position.
- Monitor the instrument cluster high beam input status PID while moving the multifunction switch from the LOW BEAM position to the HIGH BEAM position.
- Does the PID agree with the positions of the multifunction switch?
Yes
GO to
B8 .
No
GO to
B2 .
B2 CHECK THE MULTIFUNCTION SWITCH
- Key in OFF position.
- Disconnect: Multifunction Switch C202.
- Carry out the multifunction switch component test.
Refer to Wiring Diagrams Cell 149 for schematic and connector information.
- Is the multifunction switch OK?
Yes
GO to
B3 .
No
INSTALL a new multifunction switch. REFER to
Section 211-05 . CLEAR the DTCs. REPEAT the self-test.
B3 CHECK CIRCUIT 8-LE14 (WH/BU) FOR A SHORT TO VOLTAGE
- Disconnect: Instrument Cluster C220b.
- Key in ON position.
- Measure the voltage between the instrument cluster C220b-19, circuit 8-LE14 (WH/BU), harness side and ground.
- Is any voltage present?
Yes
REPAIR the circuit. CLEAR the DTCs. REPEAT the self-test.
No
GO to
B4 .
B4 CHECK CIRCUIT 8-LE14 (WH/BU) FOR AN OPEN OR SHORT TO GROUND
- Key in OFF position.
- Measure the resistance between the instrument cluster C220b-19, circuit 8-LE14 (WH/BU), harness side and ground; and between the instrument cluster C220b-19, circuit 8-LE14 (WH/BU), harness side and the multifunction switch C202-9, circuit 8-LE14 (WH/BU), harness side.
- Is the resistance greater than 10,000 ohms between the instrument cluster and ground, and less than 5 ohms between the instrument cluster and the multifunction switch?
Yes
GO to
B5 .
No
REPAIR the circuit. CLEAR the DTCs. REPEAT the self-test.
B5 CHECK CIRCUIT 9-LG43 (BN/WH) FOR A SHORT TO VOLTAGE
- Key in ON position.
- Measure the voltage between the instrument cluster C220b-9, circuit 9-LG43 (BN/WH), harness side and ground.
- Is any voltage present?
Yes
REPAIR the circuit. CLEAR the DTCs. REPEAT the self-test.
No
GO to
B6 .
B6 CHECK CIRCUIT 9-LG43 (BN/WH) FOR AN OPEN OR SHORT TO GROUND
- Key in OFF position.
- Measure the resistance between the instrument cluster C220b-9, circuit 9-LG43 (BN/WH), harness side and ground; and between the instrument cluster C220b-9, circuit 9-LG43 (BN/WH), harness side and the multifunction switch C202-8, circuit 9-LG43 (BN/WH), harness side.
- Is the resistance greater than 10,000 ohms between the instrument cluster and ground, and less than 5 ohms between the instrument cluster and multifunction switch?
Yes
GO to
B7 .
No
REPAIR the circuit. CLEAR the DTCs. REPEAT the self-test.
B7 CHECK FOR CORRECT INSTRUMENT CLUSTER OPERATION
- Key in OFF position.
- Disconnect all the instrument cluster connectors.
- Check for:
- Connect all instrument cluster connectors and make sure they seat correctly.
- Operate the system and verify the concern is still present.
- Is the concern still present?
Yes
INSTALL a new instrument cluster. REFER to
Section 413-01 . TEST the system for normal operation.
No
The system is operating correctly at this time. The concern may have been caused by a loose or corroded connector. CLEAR the DTCs. REPEAT the self-test.
B8 CHECK FOR CORRECT FEM OPERATION
- Key in OFF position.
- Disconnect all the FEM connectors.
- Check for:
- Connect all the FEM connectors and make sure they seat correctly.
- Operate the system and verify the concern is still present.
- Is the concern still present?
Probably enough for one post...


