
My 97 MK VIII has 84K miles and reading up on the plugs issues on these aluminum heads has put this all in motion. Back in my youth, pulling engines, top end rebuilds and various mechanicals of the sort was never an issue but its been a long time since those days so these newer coil over plug engines is new to me to work on for the most part and no where on the net could I find the procedure on this specific 4.6L. The components I chose is Accel 140034K-8 in Black Supercoils and E3, E3.62 plugs. For some reason the Supercoils in black are considerably cheaper than the same exact ones in Yellow. Go figure. The E3's have controversy for the 4.6L ford engine. Most say dont use them, yet others say they run good. The independant testing review of their claim of better power/mileage does infact pan out from what I saw. Mostly those claims like that dont pan out but I was willing to try these to see for my self.
This should be done on a room temperature engine. The very first thing you need to do is remove the vacuum gismo next to the brake fluid res. and tie it up out of the way so you have clear access to the plug/coil cover on the drivers side. Next, take a stiff tooth brush and brush all around the cover and wipe all around it, then blow that area clean from any loose dirt. Remove the 2 bolts on the cover and lift it off. Again, wipe the gasket area of the cover off so no dirt can fall into the coil cavities. This is basically what you'll find all tho this is the passenger side pictured.
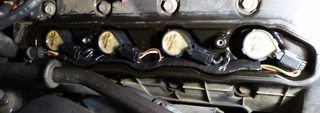
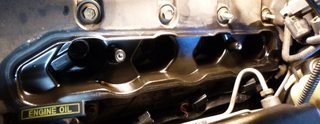
At this point, you can pull the front coil up a little and unplug it by depressing the forward part of the connector. The coil boots had some grease like oil at their sealing lip nut no pooling of oil down in the plug holes. High mileage engines typically loose their valve cover gasket seal at the plug tubes and this results in oil pooling around the plug. This condition obviously requires a new valve cover gasket job. My 84K car is still not quite there yet. With all the coils out and the wire harness put along the opening, its time to make sure the cavity is clean and free of dirt again by air gun blowing. Use a rag over the air gun since oil may shoot up out of the plug tubes.
Next I use a 5/8ths spark plug socket and a standard 5/8ths deep in the next step to loosen the plugs. You need a can of carb & choke cleaner spray as many recommend this specifically to loosen the plugs. This is a critical part of pulling these short threaded plugs out of the aluminum heads WITHOUT hopefully buggaring up the aluminum threads.
Spray about a one or two second shot of cleaner into the plug hole and using the standard socket, loosen the plug about a quarter turn out and back in slightly. The net says let the cleaner sit for 15 minutes at this point but I disagree since Carb & Choke cleaner is evaporative so my method is to slowly work that 1/4 turn back & forth so the cleaner can more quickly chase down into the spark plug threads. If you can easily turn the plug out to a half or full turn continue but also turn it back in time to time to back scrape any clinging crud off the leading plug threads. If it tightens up while turning out, put more cleaner in the hole and turn the plug back in where it turned loose slow & easy. and continue to gently work the plug "most of the way" out. Once your confidant the plug is not binding, switch out the standard socket for the spark plug socket so you can lift it out. Reason I use a standard socket first, is I get more feed back in the wrench and you can't side pressure the plug as it loosens with a stiffly mounted extension off the snug fitting plug socket. Once you have your plugs out, I found a 12 gauge shotgun bore swab works nice to clean out the plug tubes.
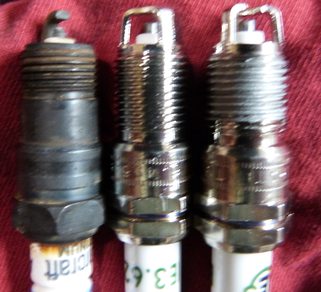
At this point, the conundrum is do you put anti seize on the plug threads or not. Most say yes but some say no because that will give you a false torque reading. My take on it is yes, but very limited and applied so you dont get any or little on the tapered binding lip of the plug. In this shot you see my original plug with a tad of corrosion on the leading threads, a clean new plug and my idea of limited anti seize. I chase the anti seize with a finger nail to get the bulk of it off and only a smidge evenly applied deep into the threads. I got a little carried away with the pictured one since you only need to do 3 or 4 bottom threads.
The torque spec is 12-15 Ft lbs on these plugs as specified from the Lincoln shop manual. I set my wrench to 14 and push a fraction past the click. Reason is, I had 2 plugs that came out that were not tight! They just spun out with ZERO braking loose. These plugs have a tendency to shoot out of the heads on rare occasion from what I'v read, so between the anti seize and loose plugs I had, I like the idea of being on the slightly high or just over the 15 lb spec. When I hit 100K miles, I'm going to pull the coils and re torque to an even 15 lb click. As far as are the E3's compatible with this ignition system? So far I have no running issues on regular gas. My car winds up to just before 6000 rpm grabs 2nd and puts me back in the seat foam just as strong at WOT or maybe better than before. My average digital mpg's is 21.1 on 87 oct. so I'll be keeping a close eye on and difference there.
So there you have it, The passenger side is easy to get at with just the intake air tube removal. Also, I also snugged the valve cover bolts that are above the coil over cover just a tad to make sure they are as tight as can be over the seepage prone plug tubes. Good Luck keeping your MKVIII charging along!
This should be done on a room temperature engine. The very first thing you need to do is remove the vacuum gismo next to the brake fluid res. and tie it up out of the way so you have clear access to the plug/coil cover on the drivers side. Next, take a stiff tooth brush and brush all around the cover and wipe all around it, then blow that area clean from any loose dirt. Remove the 2 bolts on the cover and lift it off. Again, wipe the gasket area of the cover off so no dirt can fall into the coil cavities. This is basically what you'll find all tho this is the passenger side pictured.
At this point, you can pull the front coil up a little and unplug it by depressing the forward part of the connector. The coil boots had some grease like oil at their sealing lip nut no pooling of oil down in the plug holes. High mileage engines typically loose their valve cover gasket seal at the plug tubes and this results in oil pooling around the plug. This condition obviously requires a new valve cover gasket job. My 84K car is still not quite there yet. With all the coils out and the wire harness put along the opening, its time to make sure the cavity is clean and free of dirt again by air gun blowing. Use a rag over the air gun since oil may shoot up out of the plug tubes.
Next I use a 5/8ths spark plug socket and a standard 5/8ths deep in the next step to loosen the plugs. You need a can of carb & choke cleaner spray as many recommend this specifically to loosen the plugs. This is a critical part of pulling these short threaded plugs out of the aluminum heads WITHOUT hopefully buggaring up the aluminum threads.
Spray about a one or two second shot of cleaner into the plug hole and using the standard socket, loosen the plug about a quarter turn out and back in slightly. The net says let the cleaner sit for 15 minutes at this point but I disagree since Carb & Choke cleaner is evaporative so my method is to slowly work that 1/4 turn back & forth so the cleaner can more quickly chase down into the spark plug threads. If you can easily turn the plug out to a half or full turn continue but also turn it back in time to time to back scrape any clinging crud off the leading plug threads. If it tightens up while turning out, put more cleaner in the hole and turn the plug back in where it turned loose slow & easy. and continue to gently work the plug "most of the way" out. Once your confidant the plug is not binding, switch out the standard socket for the spark plug socket so you can lift it out. Reason I use a standard socket first, is I get more feed back in the wrench and you can't side pressure the plug as it loosens with a stiffly mounted extension off the snug fitting plug socket. Once you have your plugs out, I found a 12 gauge shotgun bore swab works nice to clean out the plug tubes.
At this point, the conundrum is do you put anti seize on the plug threads or not. Most say yes but some say no because that will give you a false torque reading. My take on it is yes, but very limited and applied so you dont get any or little on the tapered binding lip of the plug. In this shot you see my original plug with a tad of corrosion on the leading threads, a clean new plug and my idea of limited anti seize. I chase the anti seize with a finger nail to get the bulk of it off and only a smidge evenly applied deep into the threads. I got a little carried away with the pictured one since you only need to do 3 or 4 bottom threads.
The torque spec is 12-15 Ft lbs on these plugs as specified from the Lincoln shop manual. I set my wrench to 14 and push a fraction past the click. Reason is, I had 2 plugs that came out that were not tight! They just spun out with ZERO braking loose. These plugs have a tendency to shoot out of the heads on rare occasion from what I'v read, so between the anti seize and loose plugs I had, I like the idea of being on the slightly high or just over the 15 lb spec. When I hit 100K miles, I'm going to pull the coils and re torque to an even 15 lb click. As far as are the E3's compatible with this ignition system? So far I have no running issues on regular gas. My car winds up to just before 6000 rpm grabs 2nd and puts me back in the seat foam just as strong at WOT or maybe better than before. My average digital mpg's is 21.1 on 87 oct. so I'll be keeping a close eye on and difference there.
So there you have it, The passenger side is easy to get at with just the intake air tube removal. Also, I also snugged the valve cover bolts that are above the coil over cover just a tad to make sure they are as tight as can be over the seepage prone plug tubes. Good Luck keeping your MKVIII charging along!