Submitted by: Eric1
Visit the Lincoln Mark VIII Forum for more help
I am writing this for the 2nd Gen Lincoln Mark VIII (1997-1998), but the procedure should be similar for the Gen 1 (1993-1996) The tilt / telescoping steering column in the Lincoln Mark VIII may be loose or lock up completely and not be adjustable at all. This is a common problem.
First, before you do anything go to your dealer and purchase the potentiometer, part number F7LZ14A605AA. This step will minimize the down time. It’s about $30.00.
LIST OF SUPPLIES
First, reach under the dash and remove the 2 black bolts that hold the cowl on under the steering wheel of your Lincoln Mark Viii and gently pull it off.
Then remove the lower cross member (4 screws) and then the 2 screws holding the computer tap to the cross member.
Now go up top and remove the caps that hide the bolts for your air bag.

Now remove air bag and put in a safe place away from any static electricity.
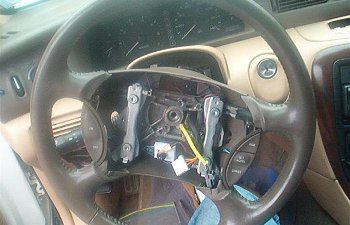
Disconnect the white connector remove the center bolt with your T-50 Torx bit and slowly with your steering wheel puller pull the wheel off.(I think you can rent them at AutoZone if you don’t have one. Don’t pull on wheel as you will only bend the wheel and make yourself tired). You do not need to make any note of wheel location as it is keyed and only goes 1 way (thank you ford) Now you should see this.
Use your Phillips screw driver to remove the shroud from the bottom of the column and the top should come off too. Take care to not turn the clock spring (the big round black piece) as it only turns so many times in 1 direction before you nee to turn it the other way. If you turn it you will have no travel and the auto canceling feature for you signals will break. I took a couple piece of tape and secured it. Now gently fish the black box up and slide the multi function switch off. Now would be a good time to replace it if you need or want too.
Now you should have full access to the bolts holding the column in. reach down to the steering knuckle and with your 10mm socket remove the crimp bolt from steering knuckle (its locktite in so you need some force) then reach under and locate the 4 nuts holding the column in place. Using your 13mm socket remove these four nuts again locktite and hard to turn.
After all of this is done you should have this in your hands, and this in your car ok get up stretch and go to a nice work table on and btw you’ll see this when you look back. Don’t worry it’s worth it. You should be about 40 minutes into this job.

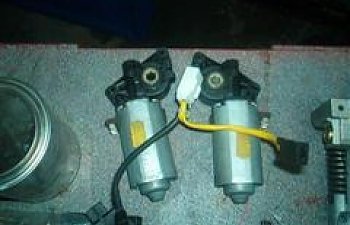
Now take your column to a table and remove the steering wheel sensor and the 2 motors that run your tilt and telescope. (They are going to require a little persuasion) and remove the 8 Torx bolts from the top with your T-20 Torx and yep you guessed it more locktite. Oh and pay attention to the direction the steel and aluminum plates face.
You should now have this. Now you should notice that you have 2 distinctly different sized cable screws. Put a socket on the larger of the 2. Slowly begin to turn the ratchet as if you were removing a bolt you will notice your column is beginning to extend continue on slowly until you are left with 2 pieces. Don’t worry about the splines they too are keyed. Remove and inspect the ball bearing and replace as needed. Remove tracks and clean all the old grease out from everywhere you can. Now with the tracks and bearings out and everything clean brush a healthy layer in the groove and then lay the track back in and add more grease to the track. Clean off any excess. Now once again use your T-20 Torx and remove the long black box this is the reason we are here. Make sure you do not lose or break this piece it’s the tab for the slider. You will notice a space for this in the housing.
Ok take a break your are now half done.
Now reinstall the potentiometer in its area. Go back to you 2 pieces and rejoin them slowly making sure not to catch the bearing retainers on the housing. Also make sure you a perfectly straight when you put the threaded rod into the hole for the telescope. Reinstall the top plate make sure you tighten the screws in an opposite pattern (like when you put on a tire) and don’t forget the locktite. After that reinstall motors and sensor. And then you should be able to reinstall it into the car.
I hope this helps you out any questions just ask.
Visit the Lincoln Mark VIII Forum for more help
I am writing this for the 2nd Gen Lincoln Mark VIII (1997-1998), but the procedure should be similar for the Gen 1 (1993-1996) The tilt / telescoping steering column in the Lincoln Mark VIII may be loose or lock up completely and not be adjustable at all. This is a common problem.
First, before you do anything go to your dealer and purchase the potentiometer, part number F7LZ14A605AA. This step will minimize the down time. It’s about $30.00.
LIST OF SUPPLIES
- 2- Socket wrenches both ¼” and 3/8″ drive.
- 1- 8 mm socket preferably in ¼” drive
- 1- 7 mm socket preferably in ¼” drive
- 1- 9 mm socket preferably in ¼” drive
- 1- 13 mm socket in 3/8″ drive
- 1- 3″ extension ¼” drive
- 1-6″ extension 3/8″ drive
- 1- Phillips screw driver
- 1-5/16″ wrench (for battery)
- 1 each T20, T30, and T50 TORX Bits or drivers
- A steering wheel puller
- Tub of your favorite bearing grease
- Tube of red lock tight
- A brush to apply grease to tracks.
First, reach under the dash and remove the 2 black bolts that hold the cowl on under the steering wheel of your Lincoln Mark Viii and gently pull it off.
Then remove the lower cross member (4 screws) and then the 2 screws holding the computer tap to the cross member.
Now go up top and remove the caps that hide the bolts for your air bag.

Now remove air bag and put in a safe place away from any static electricity.
Disconnect the white connector remove the center bolt with your T-50 Torx bit and slowly with your steering wheel puller pull the wheel off.(I think you can rent them at AutoZone if you don’t have one. Don’t pull on wheel as you will only bend the wheel and make yourself tired). You do not need to make any note of wheel location as it is keyed and only goes 1 way (thank you ford) Now you should see this.
Use your Phillips screw driver to remove the shroud from the bottom of the column and the top should come off too. Take care to not turn the clock spring (the big round black piece) as it only turns so many times in 1 direction before you nee to turn it the other way. If you turn it you will have no travel and the auto canceling feature for you signals will break. I took a couple piece of tape and secured it. Now gently fish the black box up and slide the multi function switch off. Now would be a good time to replace it if you need or want too.
Now you should have full access to the bolts holding the column in. reach down to the steering knuckle and with your 10mm socket remove the crimp bolt from steering knuckle (its locktite in so you need some force) then reach under and locate the 4 nuts holding the column in place. Using your 13mm socket remove these four nuts again locktite and hard to turn.
After all of this is done you should have this in your hands, and this in your car ok get up stretch and go to a nice work table on and btw you’ll see this when you look back. Don’t worry it’s worth it. You should be about 40 minutes into this job.

Now take your column to a table and remove the steering wheel sensor and the 2 motors that run your tilt and telescope. (They are going to require a little persuasion) and remove the 8 Torx bolts from the top with your T-20 Torx and yep you guessed it more locktite. Oh and pay attention to the direction the steel and aluminum plates face.
You should now have this. Now you should notice that you have 2 distinctly different sized cable screws. Put a socket on the larger of the 2. Slowly begin to turn the ratchet as if you were removing a bolt you will notice your column is beginning to extend continue on slowly until you are left with 2 pieces. Don’t worry about the splines they too are keyed. Remove and inspect the ball bearing and replace as needed. Remove tracks and clean all the old grease out from everywhere you can. Now with the tracks and bearings out and everything clean brush a healthy layer in the groove and then lay the track back in and add more grease to the track. Clean off any excess. Now once again use your T-20 Torx and remove the long black box this is the reason we are here. Make sure you do not lose or break this piece it’s the tab for the slider. You will notice a space for this in the housing.
Ok take a break your are now half done.
Now reinstall the potentiometer in its area. Go back to you 2 pieces and rejoin them slowly making sure not to catch the bearing retainers on the housing. Also make sure you a perfectly straight when you put the threaded rod into the hole for the telescope. Reinstall the top plate make sure you tighten the screws in an opposite pattern (like when you put on a tire) and don’t forget the locktite. After that reinstall motors and sensor. And then you should be able to reinstall it into the car.
I hope this helps you out any questions just ask.

