For more help with your Lincoln Mark VII
visit the Lincoln Mark VII Forum
Submitted by: Sifrino3 (Ramsey)
visit the Lincoln Mark VII Forum
Submitted by: Sifrino3 (Ramsey)
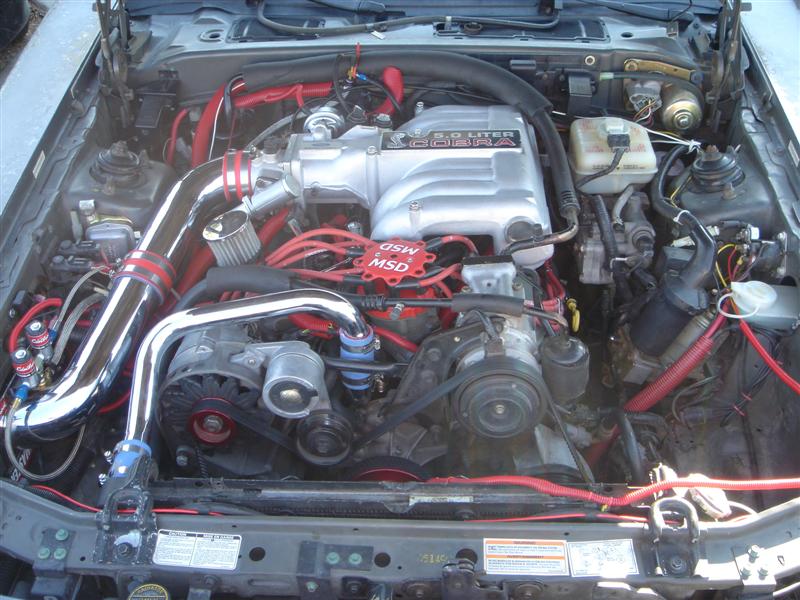
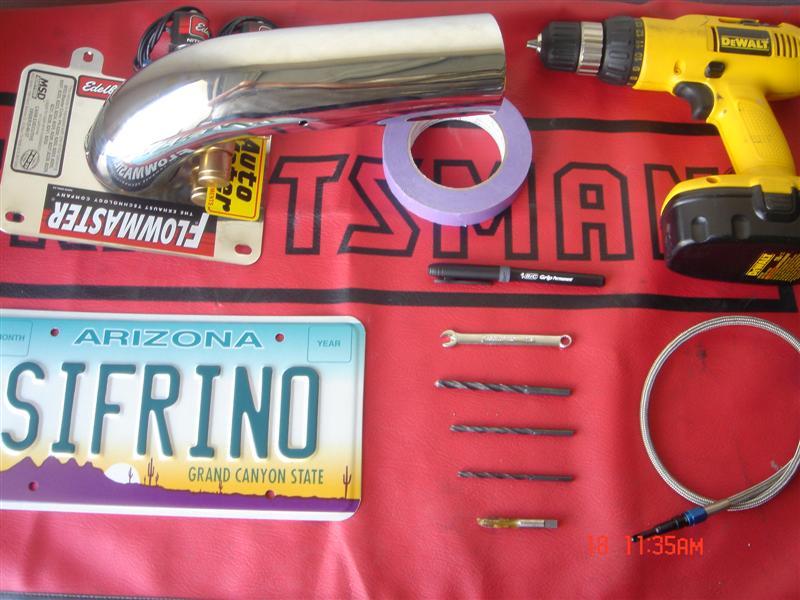
In these directions you will find out how to install an Edelbrock nitrous kit in your Hot Rod Lincoln. I do not tell you how to put together your solenoids. Because that is a step that you should read in your Edelbrock nitrous instructions. I might not go in an order that you might choose to. That is fine. You can go any way you would like. I started like this. . .
Step One:
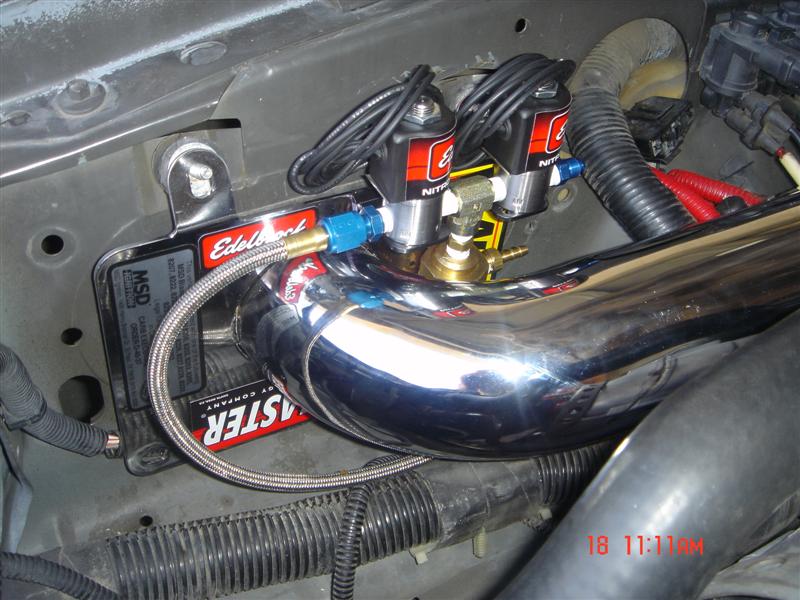
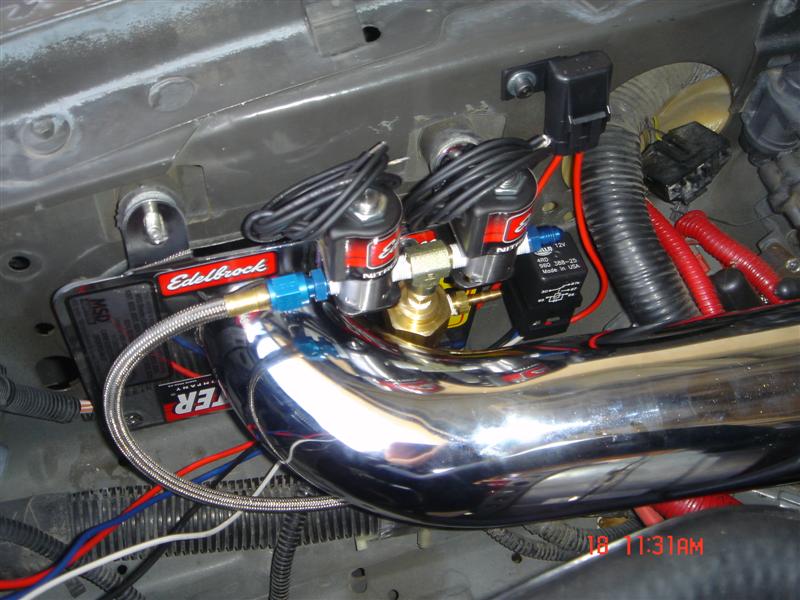
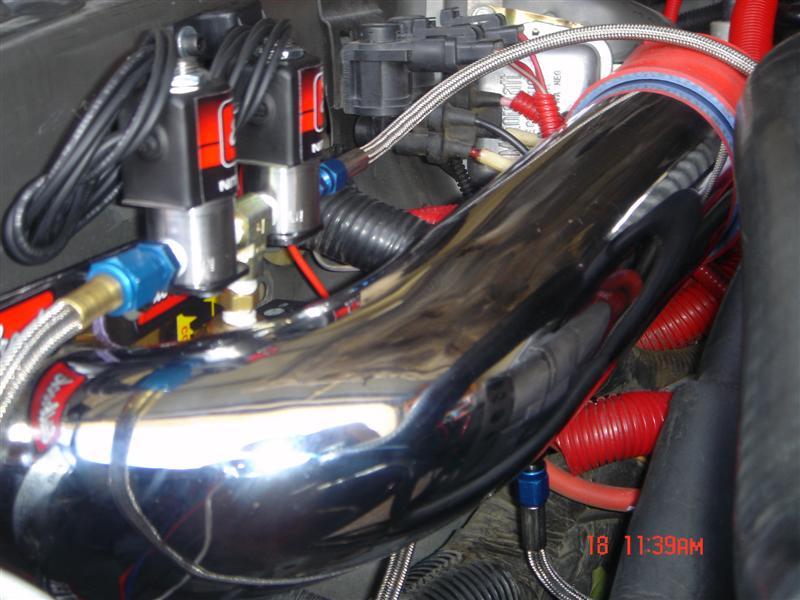
My solenoids have already been put together and I was looking and looking for a place to mount them. I could not find a spot that I really wanted to mount them. After just looking at the engine bay for several days. I decided to mount them on my Mac cold air induction. That takes air from the fender. If you have seen this intake before. You will notice that there is a very good flat piece. That goes up against the inside engine bay, to cover the whole that goes to the fender.
So, I decided I would mount my solenoids there. I took the mounting bracket that came with the nitrous kit and put it up against the fender intake. I have decided to mount it on the far corner on the panel. Before I started drilling. I took masking tape and put it on both sides of the intake panel. The reason I used masking tape is so the chrome would not chip and it is also known to make the edges clean after you drill through metal. I put the mounting bracket back onto the intake and marked my holes with a marker.
I started with a 9/64″ drill bit. After I made my holes with that bit. I went to the next bit and the next one. Till I got to 7/32″ drill bit. That was my final bit. I used about two sizes between them bits. Reason being, it’s just what I do. It makes for cleaner holes. You have to go to the Hardware Store for your bolts, washers, etc. They do not come with the kit. I made my holes a little bit bigger then the bolts I used.
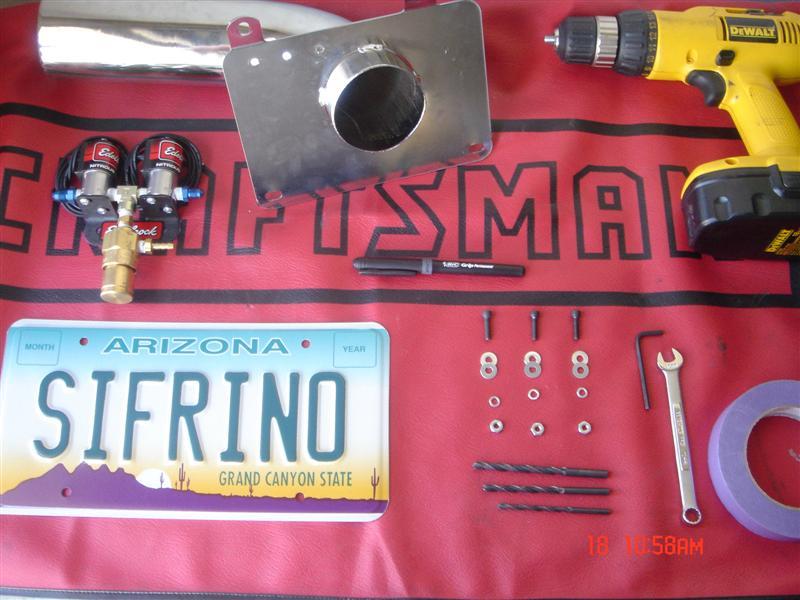
Shopping List:
Three (3) Black Hex Bolts 10×1/4″ (Size/Length)
Three (6) Washers 10 (Size)
Three (3) Lockers 10 (Size)
Three (3) Nuts 10 (Size)
After I got everything I needed at the store along with some Mtn. Dew (OS1). It was time to mount it up. I first mounted the solenoids to the bracket. (Just easier on you to do it now.) Then I put it up against my mounting holes. I’m mounting my bracket with three bolts. Because the bracket allows me to. Two bolts should be enough. (I’m safe then sorry.) I went with one hex bolt, one washer, bracket, intake plate, one washer, one lock washer, and then bolt. (In that order) I just tightened it down till the lock washer was flat. (That was for all three) After you have done your first step. Step back, take a look at what you did. Get a Mtn. Dew! Take pride, that you have done a great job!
Step Two:
This will be an easy step for you to do. It is going to be running your nitrous feed line form your solenoids. (Solenoids to Bottle) Now you have to make sure your nitrous solenoids are mounted. Take one side of your nitrous lines and screw it onto one of your solenoids. (The side that is feeding your system.) You can now take the other side of your nitrous line and start feeding it through your engine bay. Getting it down to the bottom of your floor boards. Make sure you use zip ties to keep your line secure. I fed my line where the metal fuel lines go down the car. Hooking my nitrous line with zip ties every foot or so.
Now that you have gone down your car and zip tied every foot or so. It is time for you to feed your line into the car. I found a rubber garment at the very back of the back seat. It is a perfect place. Because you do not have to dill into the body and rust could happen. So, you should drill a ½” hole. Depending on your line. It may need to be bigger or smaller. Because you want the rubber to fit tight against the line. You do not want to make it bigger then the line. Because water can then get in. (Tight against the line is best)
I have now fed it through my hole in the car and can decide where my bottle needs to be mounted in the trunk. If you would have done this step first, would your line have reached your bottle or would you be buying longer nitrous line? (Better safe then sorry)
Instead of getting in the trunk after you were just on the floor. (Tight spot to tight spot) Let’s go mount the wiring harness. That is step three for me. But first lay back and check your line/zip ties. Cut off any extra that there might be. (Zip Ties) Make sure you have enough slack in your lines for body movement. Also, make sure what you did is good enough for you. If not, it doesn’t hurt to re-do it your way!
Step Three:
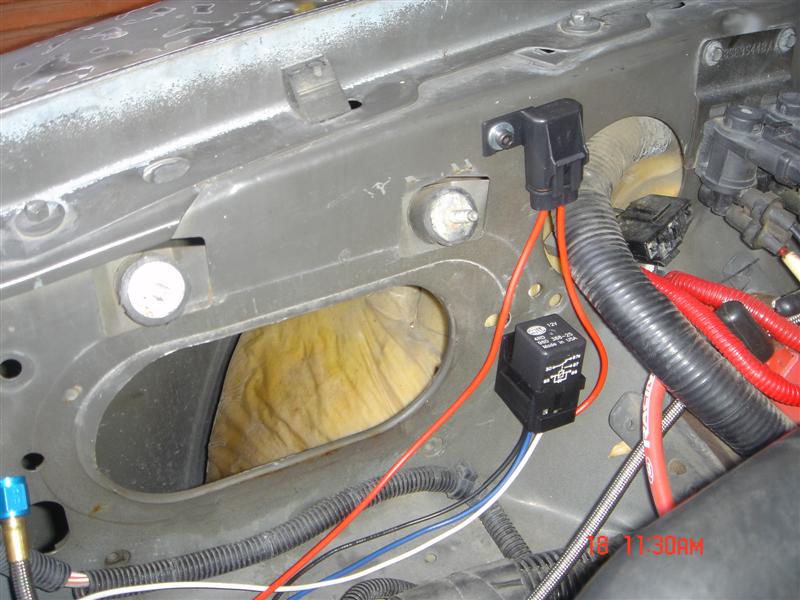
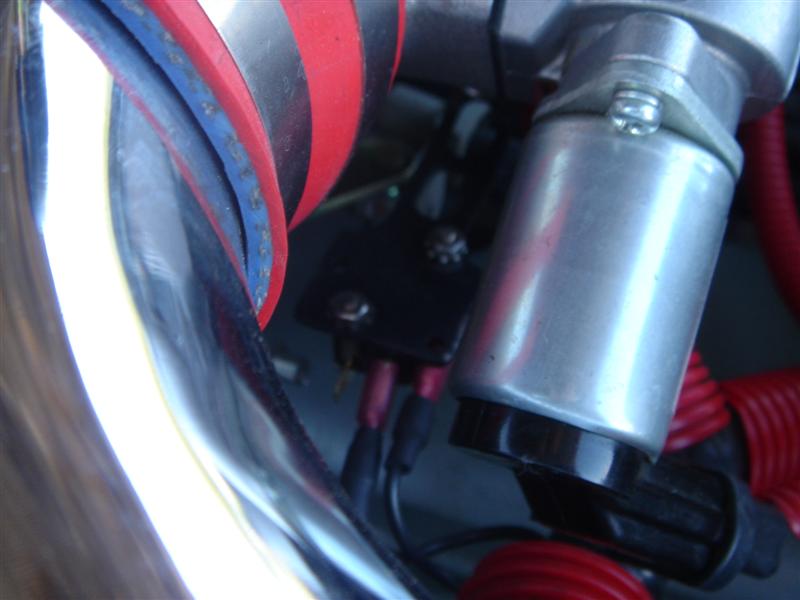
This article is going to be about mounting your Wiring Harness for your edelbrock nitrous kit. You should keep in mind where you mounted your solenoids and where your wires need to go. (Such as switches and solenoids.) In my mind set. I am looking to keep things very clean and not able to notice them in one glance. In this mind set I am willing to extend wires and nitrous lines if needed. Because it is about clean looking for me.
My first thought was. Where am I going to mount the 30 amp relay and fuse holder. I wanted to put them where I can get to them easily. Just in case. (Remember, better safe then sorry.) I found a great spot near the solenoids. And there were a bunch of holes already there. So, I decided to use two of them. (This is great, because you do not have to drill into the body and expose metal for rust.) Taking some drill bits. I put one in each hole. To see what they're sizes are. So, I can go buy some bolts, etc. My sizes ending up being ¼" and 7/32". I got my bolts a little bit smaller then the holes. So, I can use nuts. Now it is time for shopping!
Shopping list:
One (1) Hex Bolt 10
One (1) Hex Bolt 8
Two (2) Washers 10
Two (2) Washers 8
One (1) Locker 10
One (1) Locker 8
One (1) Nut 10
One (1) Nut 8
One (1) Hex Bolt 8
Two (2) Washers 10
Two (2) Washers 8
One (1) Locker 10
One (1) Locker 8
One (1) Nut 10
One (1) Nut 8
After I got everything I needed at the store. Along with some Mtn. Dew. (OS1, by now I ran out.) It was time to mount them. Here is where it paid off to mount my wire harness near the solenoids. As you can remember I mounted my solenoids on my intake plate. Well, I can take off the intake and I am able to reach through to put the nuts on. If you can not put nuts on. You will have to use sheet metal screws. I really like to use nuts and lockers. It makes for a very tight fit. That should last forever! Well, I went with one hex bolt, one washer, harness/fuse holder, sheet metal/body, one washer, one locker, and one bolt. (In that order) I did this to both of them.
Now step back. Look at what you have done. Is it what you want? Take pride in what you have done. You are almost there to be able to run nitrous on your Hot Rod Lincoln! But not before you mount your nitrous bottle.
Step Four:
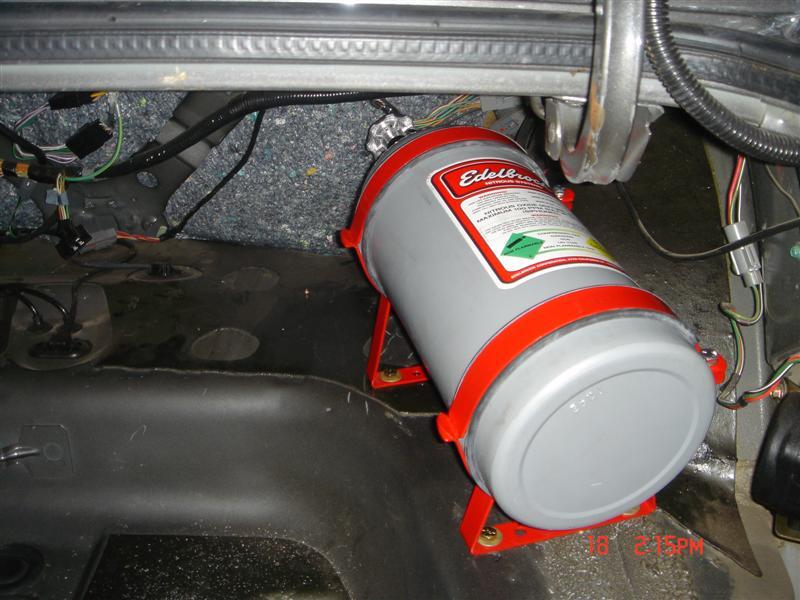
Now before you hop in the trunk to install your Edelbrock nitrous bottle. Get your bottle and brackets. Put your brackets on your bottle. (Where you want them.) Tighten everything down. If you are going to run a bottle heater. The brackets will have to be so far apart. I think it is 8 ½" from bracket to bracket. You will have to have at least 1" from your first bracket to the bottom of the bottle. (Do not go any closer to the bottom of the bottle.)
Now here are some of the things your should have before you hop in. Bottle with brackets installed, marker, masking tape. Now hop in and put your nitrous bottle where your nitrous line can reach. Before marking the wholes it is always good to use masking tape when drilling through metal. Put the tape down. But your bottle back where you want it. Now mark your holes. Get out of the trunk. Take everything with you. Now you will need a drill and drill bits.
But it isn't that easy. It's measuring and measuring. Because you need to bolt it from the bottom. I took off my rear tire and measured and measured. The frame goes right down my bolt holes. If you drill into the frame you will not be able to bolt it. So, make your holes count! After you have the holes drilled with a 3/8" drill bit. It is shopping time. Remember you will need grade 8 bolts and etc. I used one size smaller bolts/etc then the 3/8" drill bit.
Shopping List:
Four (4) Grade 8 Bolts
Eight (8) Grade 8 Washers
Four (4) Grade 8 Nuts
Now all you have to do is. Stick the bolts down from the top. My order was one bolt, one washer, bottle bracket, floor board, one washer, one nut. After you have done this. Take a good break. I know my hands took a beating trying to get them nuts screwed on. You will need a friend to help you out. Someone has to hold the top bolt while you torque the nut down. I had my very helpful wife Danielle help me out.
Step Five:
On this step I am getting you out of the trunk and to a much easier step. Installing your sprayer nozzle. Now keep in mind. You should take this step carefully and slowly. Do not rush through this step. Now that we got that out of the way.
My nitrous instructions said to drill a 7/16" hole for my nozzle. I had a few places I wanted to put the nozzle already. I really wanted to put it into my Cobra Manifold. But now knowing. You have to have it before the throttle body. Because that is where my nitrous switch is located. (At W.O.T. my
So, after I have already mounted my solenoids on my fender part of the intake. I thought I would just mount my nozzle on that same piece. Just so, all the nitrous components are just messing with one piece. Just incase I decide I do not want the nitrous anymore.
I choose to mount my nozzle on the bottom part on my intake pipe. I do not want a direct view of the nozzle. I also, wanted it to look cleaner. Plus, there is plenty of room under there for the nozzle to stick out.
Now I first put the intake back in the car and choose a spot. Putting my fingure on the spot I want it. I took the intake out. Then put masking tape where I was going to drill. I then marked with marker on the masking tape. Now it is time to drill. But just wait. I put the intake tube back in the car and checked where I put the masking take. I made sure that it was in the spot I wanted, still. (You never know, better safe then sorry.) The first drill bit I used was 13/64". Then I used one between that and ¼" for my final whole. Now that I have my hole drilled straight and true.
It was time to tap the whole. (Put threads in.) They should have given you a tap that is the perfect size for your nozzle. (Yours can be different. So, check your Edelbrock nitrous instruction book.) I put the tap in the whole and with a wrench to match the top of the tap. I slowly started to turn it. Making sure it was going straight in. It is okay to stop and look into the tube. (Do not pull out tap. Just leave it in.) Keep going slowly and check in tall you have got to the end of the tap. (Do not go all the way to the end.) Now you should slowly back out your tap. Making sure to keep your threads true
Before you install your nozzle. Clean the whole with a rag. Or blow into it. Making sure it is clean. Now you can install your sprayer nozzle. It should go in very smooth, like butter. Now take a break. Remember take pride that you did it. But don't take to long of a break. We are almost done with a nitrous spraying Mark VII!
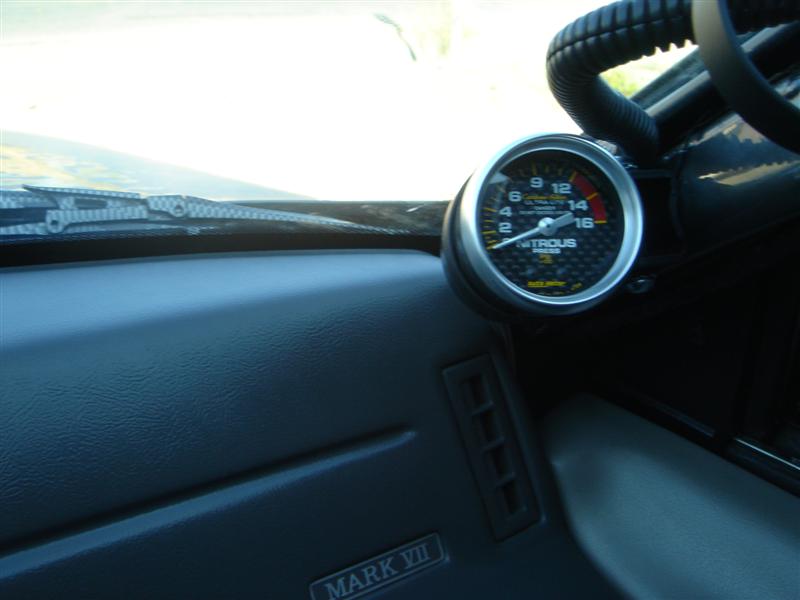
Step Six:
In this step we will get our feet wet with electrical. This being the nitrous gauge. I used a Autometer 4728 mechanical gauge. With a Autometer carbon fiber gauge pod 2121. I also needed some nitrous line. With 16 gauge wire and connectors. I used male and female connectors. So, I can easily remove the gauge.
http://www.lincolnvscadillac.com/tech/lincoln-mark-vii/Dry-nitrous-install/NitrousGauge.jpg

Now it is the time to run your nitrous gauge line to the bottle. Or you can have it hooked up by the solenoids. I choose to hook it up on the bottle. Instead of making a hole in the fire wall. . . Do not put the trim pieces over the nitrous line. Because you will have to check the line for leaks when you arm your system for the first time. (Soapy water and a brush.) Now that you have finished your gauge install. It’s on to the next step!
Step Seven:
This step should be very simple. It is mounting your activation switch or Go Baby Go Switch! Now I have a switch that sprays the nitrous at full throttle. If you just have a button. It will be even easier. But I will not cover that! This is about installing the Edelbrock nitrous kit.
Now first it comes with a bracket you can bend. Because this is kind of a universal kit. I starter with just taking a look around the throttle body area. Keeping in mind. It can not get in the way of any other parts. (Throttle cables or near heat.) Before you start bending the bracket back and forth. Just size it up. Make sure it will work. The last thing you want to do is make the bracket weak. (By bending it back and forth.) Use some scrape metal or card board.
I ended up mounting my bracket on the lower right bolt. (One of four bolts that hold the throttle body on.) I had a great advantage because I am also installing a new Ford Racing Cobra Manifold with an Edelbrock TB. So, I was able to do this outside of the engine bay. It will be a little harder doing it in the engine bay. The big thing is to have it click at wide open throttle. Not before then. So, take your time to get it right. Make sure you can hear it click. If it does not click. It will not activate the nitrous. So, once you tighten it down. Open the throttle a few times to make sure it still clicks and that’s all there is to it!
Step Eight:
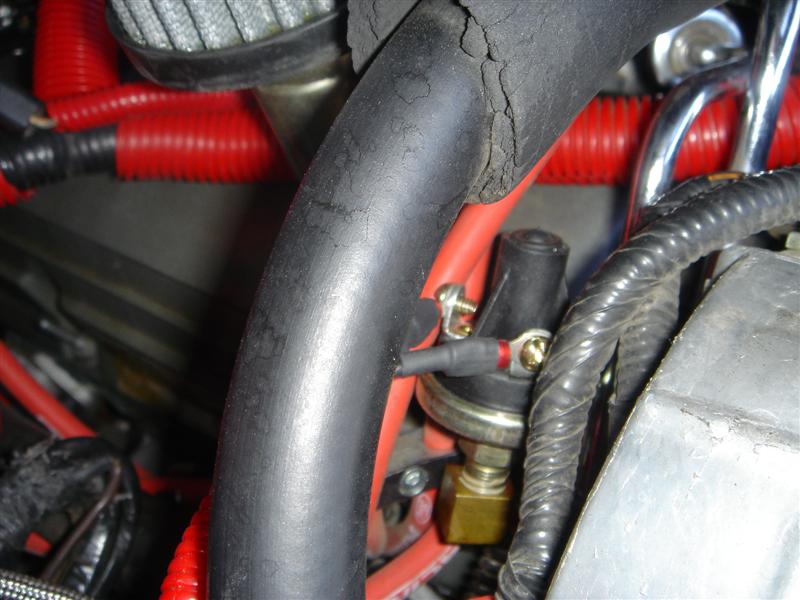
This step is too easy to make a step. But it is an important one. This will be mounting your fuel regulator. You first have to take off the pressure restrictor on the fuel rail. This is located by the intake tube going down the engine.
While you screw it off. There may be fuel in the rail. So, hold a rag under it. So, it will not leak all over the engine. Now that you have gotten it off. You will need to take the adapter piece that came with your regulator and screw that on first. Once that is tight. Take your regulator and screw it on.
You are finished. Make sure you can get to the power and ground screws when you do the wiring. Now on to the next step!
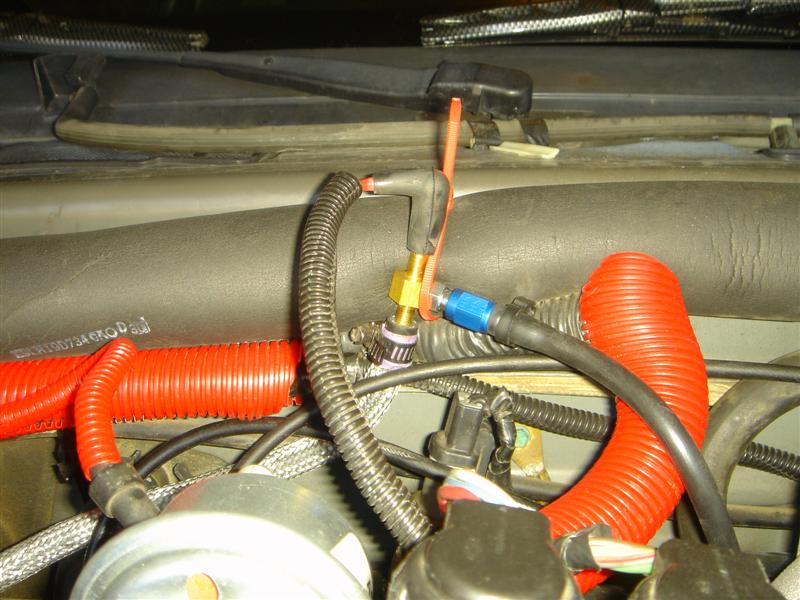
This step we will be installing the fuel jet and T fitting. You will need to unplug the vacuum line from the rear of the upper intake. The one that leads from the intake manifold to the fuel regulator.
Now with you “T” fitting. You will need to run a line from the Bottom “T” opening to the rear of the manifold.
The bottom part of the “T” fitting is the one side that holds the fuel jet. It also the part that unscrews. Now once you have done that. Take the line you took off in the beginning and run it from the Right side of the T sitting to the fuel regulator. Now the last part. Will be to run a line from the Left side of the T fitting to the nitrous fuel regulator. (Nitrous regulator that sits just under the nitrous solenoids.)
Once you have all lines tighten down. You have finished step nine. One more thing, I took a zip tie and tied the T fitting to a rubber hose. So, I can easily change out the fuel jet. You might want to do the same and also install the jet you want.
Step 10:
I first started with the wires on the solenoids. The first one has two wires. One to the ground the other to the harness. I cut them down to length and put some male/female connectors on the wires. The second solenoid has two wires also. One goes to the harness and the other goes to the fuel pressure switch that you put on the fuel rail. On both solenoids, the one that goes to the harness. You have to connect together and connect them to the blue wire coming from the harness.
Now let’s wire up the throttle switch. The black wire that comes from the harness has to connect to the middle opening of the switch. Now you have to put a ground on the opening that is on the right side that is on the side of the switch.
We will now have to wire up the switch in the car. That activates the system. You have to drill though the fire wall and run the white wire to your switch location. After wiring the white wire to the switch you will need to install a ground to the switch. After you have done that. There is one more line. A power line. You may want a line that only has power on the start position of the key. I just used the line (Power& Ground) from the cig lighter. Since I don’t have a cig lighter anyways. Once you are done with that. You will need to put any trim back on if you had to take any off.
Now is the last step. Running the MAIN power line to the nitrous. It is a red wire coming from the fuse holder that is part of the harness. Once you have wired that up. You are now DONE! You may want to take all the wires away in loom or something. Just make sure everything is tied up out of the way!
LAST CALL:
Before spraying you’re nitrous for the first time. Read your instructions. They may ask you to do something after your first spray. If you are having problems while running your nitrous. Check back in your Edelbrock nitrous instruction book for problem solving. Have fun! This is the easiest horse power you will ever get.
P.S. You will have to fill up your Edelbrock nitrous bottle. . .