
|
|
|
|
|||||||||||||||||||||||||||
LINCOLN MARK VIII 4R70W TRANSMISSION1-2 SHIFT ACCUMULATOR REPLACEMENT "JMOD" |
|||||||||||||||||||||||||||
Submitted by BlackiceLSC /
06-05-04 |
|||||||||||||||||||||||||||
|
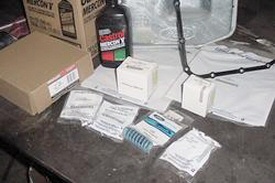
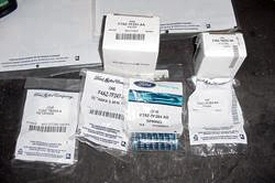
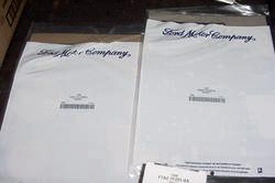
Parts
You Will Need
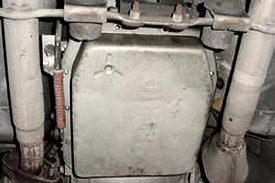
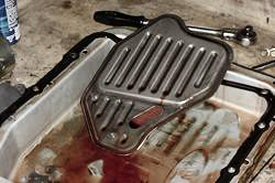
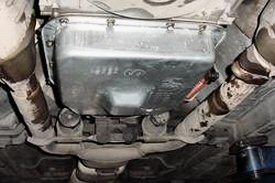
Removal Drain the transmission
Next, remove the old filter from the transmission
Don't forget to remove the magnet stuck in the old pan ---- Carefully un-plug the 4 electrical connectors from the transmission
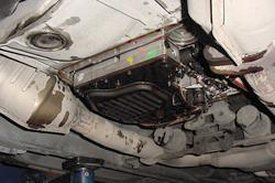
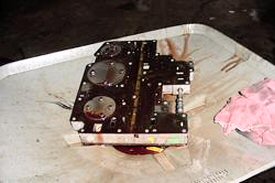
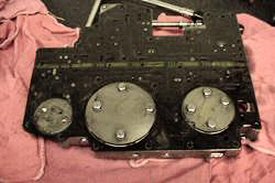
Next, remove the 25 bolts attaching the valve body to the transmission. Before you can remove the separator plate from the valve body, you must remove the three round covers, and one small bolt in the corner. Be sure you note how these covers come off so you can be sure they go back on the valve body when you are finished with the separator plate modification.
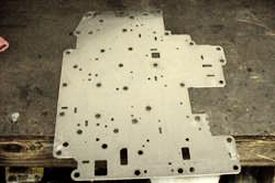
Now you will need
to remove the old gaskets from the separator plate. Use a sharp putty
knife, or gasket scraper. Be absolutely sure you remove ALL traces of
the old gaskets from the separator plate
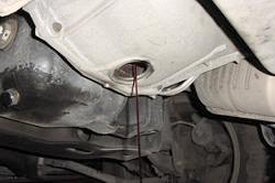
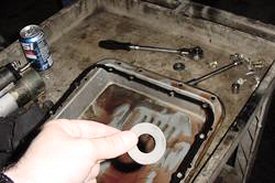
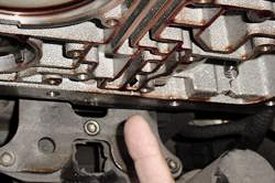
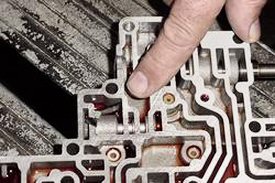
Now remove the
old 1-2 shift accumulator assembly from the transmission. The 1-2 shift
accumulator is located inside the round cylinder cavity on the forward,
driver's side of the bottom of the transmission case. In the photo you
will see 4 round covers in the bottom of the case. The 1-2 shift accumulator
is in the hole located in the top right of the photo
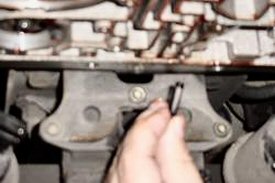
The next thing
you want to do is to compress the 1-2 accumulator assembly by use of a
large C-clamp. There is a flat-ledge location on the upper side of the
transmission case to lock the C-clamp on while you compress the 1-2 accumulator
by tightening the C-clamp. You will then need a good pair of C-clip pliers
to remove the snap-ring that holds the 1-2 shift accumulator retainer
in place
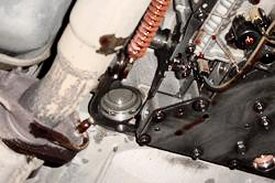
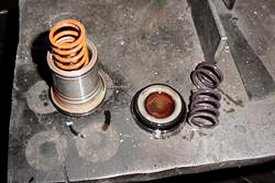
Once you remove the snap-ring, simply loosen the C-clamp, and let the 1-2 accumulator retainer come out. The entire 1-2 accumulator assembly should come right out with the retainer. Once it is all out of the cylinder bore, inspect the cylinder for damage/wear. If it looks clear, simply wipe the cylinder with a piece of scotch-brite and a clean cloth. The picture shows the entire 1-2 accumulator assembly removed, including the broken lower spring.
This is where a lot of people stop. In the case of my vehicle, I decided to replace the 2-3 shift accumulator assembly as well since the valve body was out. Unfortunately, I do not have any photos of this procedure but I will describe it for you. It is actually a lot easier to replace the 2-3 shift accumulator assembly. The 2-3 accumulator is located in the opposite, rear corner of the transmission case. Simply grab the retainer with needle-nose pliers, and pull it down. Then, by putting pressure with your fingers on the inside wall of the 2-3 accumulator piston, pull downward, and it will come out. There is only 1 spring in the 2-3 accumulator assembly. It goes into the top of the piston. With a small amount of clean Mercon V fluid, slightly lubricate the new piston, and insert it back into the cylinder bore. I left the new spring out to firm up the 2-3 shift. Then, bend the three tabs on the new retainer outward to hold it inside the cylinder. It should "snap" into place. That's it! The "JMOD" Now back to the separator plate. In this case, I am performing what is known as the "JMOD" to my transmission. This modification was published by one of Ford Motor's Master Transmission engineers named "Jerry". I will fill you in more on this at the end of the article. What the "JMOD"
entails in simple terms is the modification of the valve body separator
plate to improve fluid pressure to critical components in a more efficient
way by boring out some of the holes in the separator plate. This is highly
recommended on ANY automatic transmission that is going to be subject
to horsepower increases, or mild to moderate rear differential gear changes.
To learn more about this modification, click HERE. After you have performed
the "JMOD" to the separator plate, be sure there are no burrs
from the drilling. Install the new separator plate gaskets, and the rest
of the valve body as it came apart.
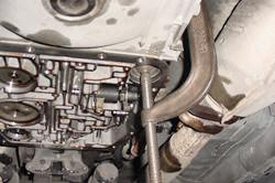
It is now time
to re-install the valve body. Be sure that you align the linkage assembly
with the shaft on the driver's side of the valve body. A common occurrence
is to end up with the linkage out of position. Below is a picture of such
a mistake
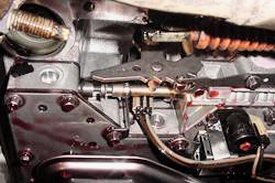
I re-installed
the valve body without aligning the shift linkage with the shaft. Notice
in the center of the photo the jagged bracket, or "Rooster"
has a pin that aligns with the horizontal shaft traveling front to rear.
In the photo, you can see how the pin is lined up with the center of the
shaft. It should be toward the front of the shaft, between the two retainers.
I discovered this AFTER installing the pan, and 10 qts of fluid. I had
to remove the pan and the valve body to correct this error!
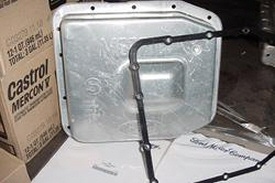
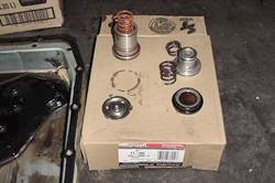
Now refill the
transmission with about 10 qts of Mercon V fluid, check the level. It
should hold 12 quarts total. Do not over fill. Here is a picture of the
left over parts
You're done! Now go test drive the car. Your "JMOD" transmission upgrade to your Lincoln Mark VIII is finished. I spent a total of about $150.00 in parts, and about 4 hours labor. I had the luxury of using a lift at "Big Johnson's Auto Repair" in Santa Rosa. I also had the help of John Schmidt. aka JOHNAEC, a well known icon on the Lincoln and Thunderbird websites. This job would not have gone near as smoothly as it did without John's help. He supplied all the literature from the TCCOA website, Jerry's thesis, as well as the specialty tools required (drill bits, torque wrench, C-clamp, snap-ring pliers), not to mention his handiwork when it comes to messy jobs. UPDATE!!! As you recall, I elected to leave the lower spring out of the 1-2 shift accumulator assembly for "firmer" shifts. Well after a few days of driving the car, I was concerned that the 1-2 shifts were TOO firm. The "JMOD" did exactly what it is supposed to do. It made the shifts very quick with no noticeable slippage. But since I left the lower spring out of the 1-2, the shifts became a lot firmer than I had anticipated. So much firmer that I was concerned that perhaps it would cause un-wanted driveline damage. U-joints, half-shafts, CV joints, or worse, internal transmission components. After all, I had performed all the work to ensure longevity of the transmission, not to destroy it. Well, today I decided to get back under the car, drop the pan, and install the lower spring in the 1-2 shift accumulator assembly. I am very pleased with the end result. The my Lincoln Mark VIII shifts exactly the way I wanted it to. It now shifts firm enough at W.O.T. (wide open throttle) that it easily "chirps" the tires. But during normal driving, the shifts are quick and firm, but not so firm that I am worried about anything sustaining damage. The perfect combination of performance, comfort, and efficiency. The "JMOD" is a complete success. If anyone is considering eliminating the lower 1-2 spring with a "JMOD" upgrade, be prepared. The shifts are very harsh. You will easily break the rear tires loose during heavy acceleration. This is what a lot of people are looking for. Just be sure your driveline is up to snuff to handle the extreme change in shift performance. I was looking for something I have never had before. I wanted sharp shifts, with no slippage between gears. I wanted to "chirp" my tires under heavy acceleration. I wanted to have shifts that were not extreme, but close to normal during every day driving. I wanted all this without worrying about excessive wear to the internal components of the transmission, or the driveline components. The "JMOD"
gave me everything I wanted, and more. You should expect perfection. I
had no idea my Lincoln Mark VIII would be so much more fun to drive! |
|||||||||||||||||||||||||||
|
This area is intended for Tech Tips submitted by members of LincolnvsCadillac.com. The opinions expressed here are the opinions of the individual author and do not necessarily represent the views of LincolnvsCadillac.com. Undertake these procedures at your own risk. If you have any comments or questions please contact the individual authors. Reader assumes all the risk associated with the installation of aftermarket products. LincolnvsCadillac.com and its owners are not responsible for any direct or indirect damage to the vehicle, person or persons and the resulting costs incurred from the installation or use of these products. LincolnvsCadillac.com recognizes that "Cadillac" and "Chevrolet" and their respective logos, model names and numbers are registered trademarks of the General Motors Corporation. These and other terms used on this website are used for identification purposes only. Lincolnvscadillac.com is not affiliated in any way with the General Motors Corporation, Cadillac, Chevrolet, Mobil or any other website or company listed herein. |
|||||||||||||||||||||||||||