
|
|
|
|
||||
SUSPENSION SENSOR LOWERING |
||||
By: Kale Kainoa - djkale |
||||
|
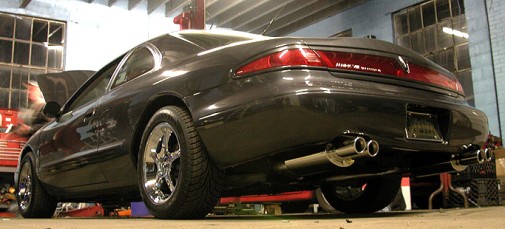
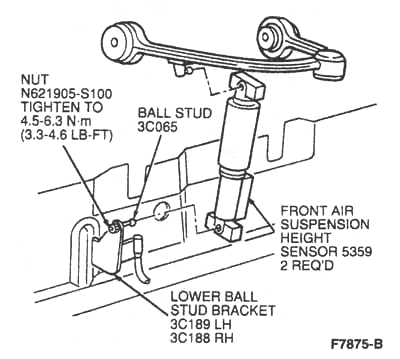
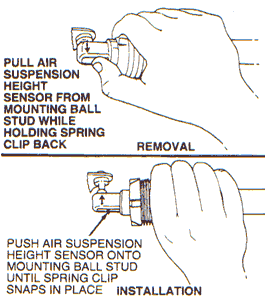
There are THREE height sensors on the Lincoln Mark VIII, two up front and on located on the drivers side rear (see pics). The basic concept behind this modification is to compress the front sensors and extend the rear. To explain why this is the case, I have included these pictures:
Imagine what would happen if
you were to raise the frame of the vehicle, or if the wheel attached to
the suspension arm were to move downward. Vehicle height would raise and
the sensors would compress. This would cause the car to think it was high
and therefore vent air from the bags making the car sit lower. The reason
the rear is different is because it is a different sensor. When I designed
a modified height sensor system, I noticed that the front sensors needed
additional voltage to cause a bleed signal while the rear needed a reduction
in voltage. They work differently. WARNING: Performing this modification could emphasize existing defects of the bag and cause one or more bags to leak.
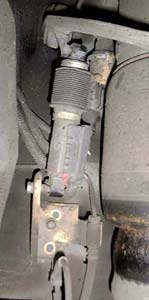
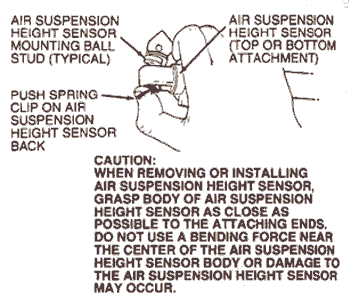
1. Turn air-ride switch OFF, loosen lugnuts, place vehicle on jack stands and remove both front wheels. 2. Locate the mounting bracket and dislodge the sensor from it's mounting stud. There is a small metal tab that must be pulled, which allows you to dislodge the ball from its mount. Measure the amount of travel required to compress it completely and make a note. You can simply eyeball it if you wish. 3. Drill a hole in the bracket directly below the top mounting bolt. This hole should measure the same distance that was required for the sensor to compress. You can do this while the bracket is attached to the vehicle. NOTE: You are drilling a hole through the bracket only, not through the bracket and into the vehicle. Also, make sure the bolt will fit through the hole that you drilled. 4. Loosen the bracket and reattach it by placing one of the bolts through the hole that you just drilled, and into the top mounting hole in the vehicle. You have essentially moved the bracket up. 5. By turning the bracket left or right, you have a small amount of adjustment to make up for any miscalculations. 6. That's it. Let the car down, turn the air-ride switch ON, start the car and let it level, then turn the car off to see the results. It should drop down approx. another 1" or so, depending on where your sensor was located to start with. It could be as much as 2.5"-3.0" inches on some vehicles. REAR
1) Turn off air-ride suspension
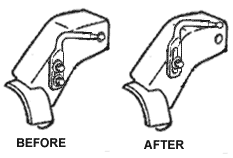
switch, and back the car onto a set of ramps. 2) Locate the rear sensor upper mounting bracket and remove the attaching bolts. Rear sensor mounting brackets differ. There may be one or two bolts attaching the bracket. There should be a long slot in the bracket where you can slide the bracket up and down (see picture). I have been told that some models do not have a slot.
3) Remove the sensor by pressing the release clip. Reposition the upper bracket so that it sits higher, tighten the bolts, then reattach the sensor. WHEN THE SENSOR IS REMOUNTED, IT WILL BE EXTENDED. Since you will be back under the car again to make adjustments, just attach one bolt snugly. Make a note of how much you moved the sensor. It should be almost directly proportionate to the amount of drop. 4) Drive the car off the ramps.
Turn the air ride switch on, then restart the vehicle. Make a note of
where the settles. If it is too low, you must move the mounting bracket
lower, COMPRESSING THE SENSOR. If it is too high, reposition the bracket
higher, EXTENDING THE SENSOR. 5) Repeat until you arrive at the desired height. Enjoy your Lincoln Mark VIII! For questions or comments about this modification, send me an email. |
||||
|
This area is intended for Tech Tips submitted by members of LincolnvsCadillac.com. The opinions expressed here are the opinions of the individual author and do not necessarily represent the views of LincolnvsCadillac.com. Undertake these procedures at your own risk. If you have any comments or questions please contact the individual authors. Reader assumes all the risk associated with the installation of aftermarket products. LincolnvsCadillac.com and its owners are not responsible for any direct or indirect damage to the vehicle, person or persons and the resulting costs incurred from the installation or use of these products. LincolnvsCadillac.com recognizes that "Cadillac" and "Chevrolet" and their respective logos, model names and numbers are registered trademarks of the General Motors Corporation. These and other terms used on this website are used for identification purposes only. Lincolnvscadillac.com is not affiliated in any way with the General Motors Corporation, Cadillac, Chevrolet, Mobil or any other website or company listed herein. |
||||