Re&Re - OEM Degas Bottle - GEN 1 V8

RigsLS

Dedicated LVC Member
Joined
Mar 10, 2012
Messages
7,756
Reaction score
532
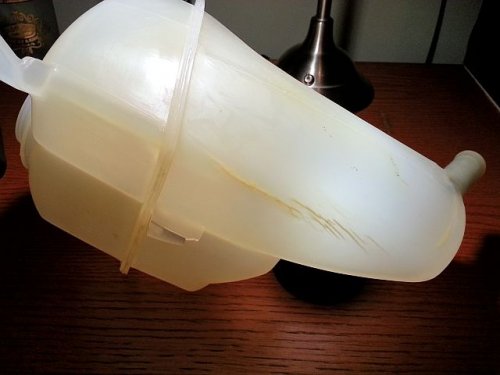
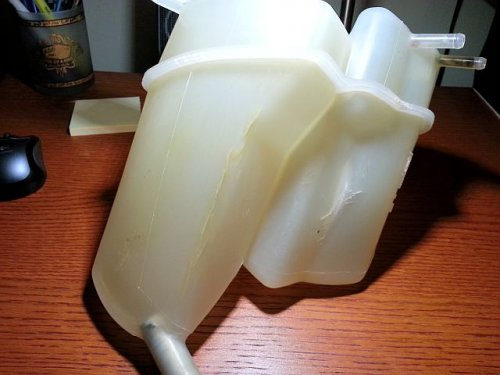
Symptoms: Engine Overheating and/or dripping Coolant directly behind front drivers side wheel.

Direct Cause: Old deteriorated cracked Degas Bottle.
degas1.jpg
degas2.jpg

Correction: Replace Degas Bottle with OEM part only. (p/n 5W4Z-8A080-AA)


Removal and Re-Installation aka: Re&RE


1) Drain the engine cooling system.

2) Remove both wiper blade arms and the cowl vent screen.
attachment.php?attachmentid=828455344&d=1364780835.gif


3) Disconnect the engine vent hose, and separate the air bleed hose from the degas bottle.
attachment.php?attachmentid=828455345&d=1364780910.gif


attachment.php?attachmentid=828455321&d=1364731823.jpg


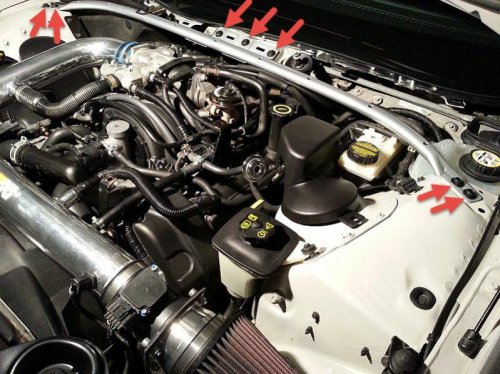
4) Remove the seven bolts and reposition the cross vehicle support.
attachment.php?attachmentid=828455346&d=1364781058.gif


5) Disconnect the degas return hose from the degas return tube.
attachment.php?attachmentid=828455347&d=1364781179.gif


icon4.gif
down along the firewall just past the Brake Booster housing.
attachment.php?attachmentid=828455322&d=1364731823.jpg


icon4.gif
you can move a few things out of the way to provide easier access.
attachment.php?attachmentid=828455323&d=1364731823.jpg


6) Remove the two bolts. (that hold the Degas Bottle in place)
attachment.php?attachmentid=828455348&d=1364782101.gif


7) Remove the degas bottle from the vehicle.
attachment.php?attachmentid=828455351&d=1364782266.gif


8) To install, reverse the removal procedure.


When the new bottle goes in, your going to find that feeding the lower hose (already attached to the new bottle),
underneath the Brake Booster, is prone to want to go underneath the Steering Shaft Knuckle (at the firewall) due to the angle.

attachment.php?attachmentid=828455324&d=1364732627.jpg


I used a long stick about 3 feet in length guided down from near the front of the Coil cover,
pointing towards to the Intermediate Steering Shaft Knuckle at the firewall ...

attachment.php?attachmentid=828455325&d=1364734697.jpg


... helped in pushing the lower hose upwards overtop of the Steering Knuckle.


icon4.gif
Apply a little vaseline around the tip of the aluminum degas return line to aid in getting the new hose on.

icon4.gif
The return hose will need a little convincing with a long screw driver to coach it onto the Aluminum return line.

icon4.gif
The clamp on the return tube of the new degas bottle is provided in the open position and getting it to unsnap is a bit tricky

degas1.jpg


degas2.jpg
 
Last edited by a moderator:
Bump <shrugs> just because.
 
Good write up, not the one I saw, but still outstanding. I'm in a pinch right now, if I can make the Dorman crap work for a month I'll be set, then I'll return the dorman, get the OEM, and thats one less thing on my list of crap to fix. +1 Bigrig
 
Careful with the Dorman crap bottle, I've read many of folks complain that they aren't worth the plastic they are made of.

There seems to be issues with the weak design of the thread on either the pressure cap or bottle thread itself, preventing a tight seal which is needed in order to maintain pressure throughout the cooling system.

I have zero experience with the Dorman bottle myself so I can't say for sure, just going by how everyone warns others to stay away from using the Dorman.


GLW w/ repairs.
 
Excellent write up Rig, will definitely help people with this common problem.
 
If that's the case, I'll put some rope dope on it, if that's the issue. I'm very crafty about making things work properly with assistance :D
 
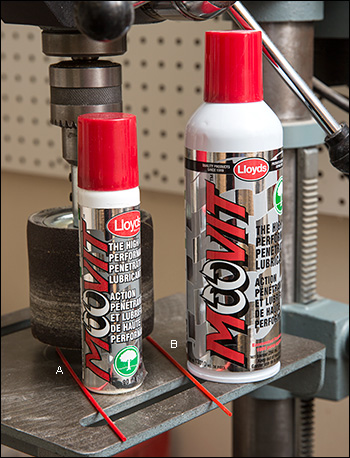
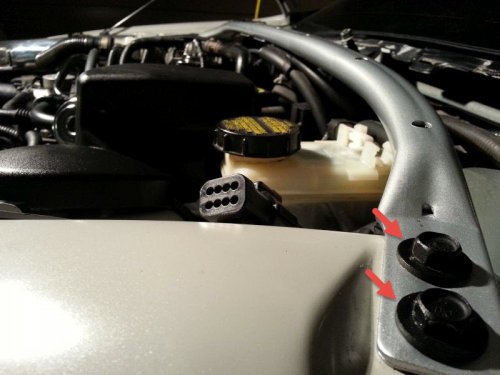
while your e waiting for the part to come in, start soaking the bolts that hold the cowl brace in with a good penetrating oil for the next few days, then hopefully, you'll have one less think to possibly worry about when it comes time to do the job...
 
yes, the cowl (black plastic under windshield) clips into it to hold it down, it bolts in near the shocks and then at the center up to the fire wall. those bolts have been know to rust up and snap off when trying to remove.
 
I find that stuff, MOOVIT works wonders, got the idea from a mechanic bud of mine, it's all they use in the shops around here.

56Z4450s1.jpg

56Z4450s1.jpg
 
Yeah why not, works just the same as all the other hundred cans out on the store shelves.

GLWR, don't forget, you need to bleed the system properly and get all the air out of it or it will continue to overheat.

Sure hope you are replacing more then just the Degas bottle, lot of brittle old plastic parts that make up the cooling system on both GEN's.
 
Little trick on loosening old bolts, tighten to the right just a hair or two before loosening to the left.

Try and get the spray directly under the washer into the thread, let it sit for a day or so, it will come loose n/p

Spray it in the direction where gravity will run the fluid down underneath into the thread.

bolts1.jpg

bolts2.jpg


As Loud1 said, many of people have snapped those bolts right off. It would require drilling it out to correct it. just more work.

bolts1.jpg


bolts2.jpg
 
Hmmm, degas bottle on both GEN's should be same deal.

It is really close to the same. The only difference I can think of off hand is that gen II has the washer nozzles in the cowl, so you have that hose to disconnect on gen II.
 
I still believe the hardest part about changing the degas is accessing the hose clamp for the lower hose (if you don't have cable pliers). Took me quite a while to reach it and remove it. Everything else is as easy as can be.
 
I still believe the hardest part about changing the degas is accessing the hose clamp for the lower hose (if you don't have cable pliers). Took me quite a while to reach it and remove it. Everything else is as easy as can be.

The new bottle comes with that hose attached, so you just disconnect it from the pipe it connects to, out in the open. As long as you get the Genuine Ford tank...
 
The new bottle comes with that hose attached, so you just disconnect it from the pipe it connects to, out in the open. As long as you get the Genuine Ford tank...

Yeah but you have to remove the old hose.... and it's one of those clamps that's a pain to get off. And it's not out in the open. Nothing is in this engine bay. Haha
 
Yeah but you have to remove the old hose.... and it's one of those clamps that's a pain to get off. And it's not out in the open. Nothing is in this engine bay. Haha

After just finishing an engine change job, I finished up with a degas bottle change, so I may be biased. :) Anyway, the best tool investment you could make for anything to do with working on this car under the hood has to be to get your hands on the spring hose clamp, cable actuated hose clamp management tool. I don't even take mine out of the car now.

water-pump-died.jpg

water-pump-died.jpg
 
After just finishing an engine change job, I finished up with a degas bottle change, so I may be biased. :) Anyway, the best tool investment you could make for anything to do with working on this car under the hood has to be to get your hands on the spring hose clamp, cable actuated hose clamp management tool. I don't even take mine out of the car now.

View attachment 828472942
Where can I get one from and how much do they cost
 

Members online

Back
Top